At any point in your career as a woodworker, there will come a time wherein you need to sharpen your tools, such as planes and chisels. Tools that are dull will not accomplish much, and they can also pose risks to your safety. One way to deal with this is to use a honing guide board. Individuals who promote the use of a honing guide board are those who are professional woodworkers, who need to sharpen all their tools each day without wasting time.
This only means that the use of a honing guide board will help you accomplish things faster. However, things might get confusing, especially if you have not yet tried doing so. Well, that’s the reason why we have come up with this guide on how to use the honing guide board the right way. Refer to the steps below, and get your job done – quick!
Materials Needed:
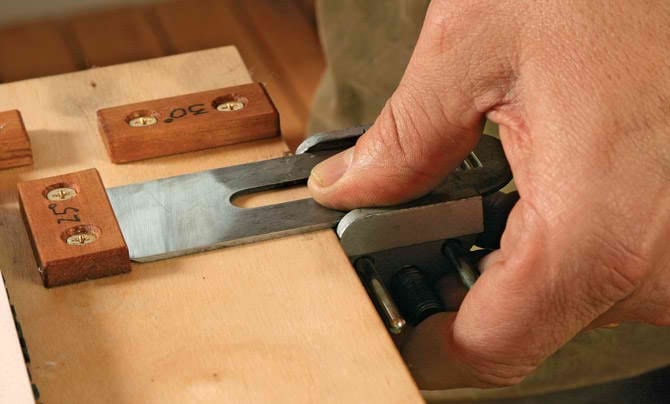
- Rectangular blocks (25 degrees, 30 degrees, 35 degrees, 40 degrees)
Instructions:
Step 1: Set the rectangular blocks up

The use of rectangular blocks play an important role in using the honing guide board appropriately. Prepare four rectangular blocks, with different degrees as mentioned earlier. These are usually the most common angles that you may use in your shop. As you place a chisel or plane iron on a honing guide, with the bevel facing down, that is, towards that part where the wheel is, the tool’s cutting edge will have contact with your rectangular block, regardless of the degrees that you have selected. This should be done as the front part of the honing guide is against the front end of the board.
Step 2: Tighten the honing guide

This needs to be done when both the guide and the iron are already against their own surfaces. This is also done in order to makes sure that the iron is securely held in place. After completing this, you have already set your iron at a specific angle. Every time that you do this process, so long as the cutting edge is against a block, you can expect repeated results.
Step 3: Pre-sharpening procedures

Now you can start sharpening! However, just before starting, makes sure that the honing stone is flat, as this will easily transfer the shape to the tool that you are sharpening. As such, it becomes quicker and easier for you to flatten the stones out compared to working on removing all of the needed steel just to give the tool its flat shape. You can also put some dark sharpie towards the tool bevel, as this can allow you to confirm that you are indeed sharpening at the right angle.
Step 4: Start sharpening

Finally, you can now start sharpening using your honing guide board. With this, you can set the wheel of the guide to the stone first, letting the cutting edge of the lion to touch the stone gently. One tested method is to set the honing guide at the far end of your stone, and the edge away from you.
Next is pulling the iron and honing guide towards you without using downward pressure. This can be done in just a single stroke. The sharpie should be removed out of the current micro-bevel. If not, however, you can take the guide again, moving the block to the next higher angle, slightly releasing pressure on the guide, as well as the guide against the board’s front edge.
Step 5: Give attention to the back of the iron

After finishing the honing and sharpening on your tools, the back part of the iron also needs to be given serious consideration. For this, you can use the famous “ruler trick” wherein you can easily use an extremely thin metal ruler that is laid on one edge of the 8000 grit stone.
For this, iron is removed coming from the honing guide, placing it in a way that it becomes across the width of the stone, as it rests on top of the ruler. Because the honing process can create a small burr on the iron’s back, you can begin with the cutting edge that hangs off the stone, moving it straight back so that the cutting edge will come to the stone.
Conclusion
The value of a honing guide board is unparalleled for you as a woodworker. If you have not yet tried using one before, now is the time to experience the advantages that it offers in your craft. While there may be some other ways on how to use this tool, the instructions mentioned above is a tested way to use a honing guide board.
If you have other suggestions or ideas on how to use the honing guide board the right way, feel free to share them below in the comment section. Don’t hesitate to share this article too if you liked it!
