We all know that Wines need to be kept in a safe place if they are to be stored for a specific time. There is no other way to store wines safely other than investing in a wine rack. But why spend money when you can easily build your own?
Building wine rack is an easy project that can most of the time be completed in a day, depending on how large and detailed you would like it to be. The free wine rack projects feature racks in all different styles so be sure to look through the whole list. There are horizontal, vertical, and even custom wine rack plans. Some of them will hold 6-bottles of wine where some of the modular plans can hold dozens of bottles.
Not every one of us is a fan of wine, but you can’t deny that every house might have a bottle or two that were maybe a gift for some special occasion. So, if you are planning on keeping such wine bottles and popping them for another special occasion, then you have to keep them properly. Here is an excellent wine rack DIY project around the web. It’s super simple – you will wonder why you didn’t think of this before on your own.
Check out the complete project guide with the images.
Here’s the list of all the supplies for the wall mounted Wine Rack
Materials Needed To Build an Industrial Wine Rack
- Three 1″x4″ x4ft wood, or scraps that you have on hand
- Four 1″x6″ x6ft wood or scraps
- One 2″x4″ x4ft wood or scrap
- One 1″x2″ x8ft wood or scrap
- 1/2″ Galvanized piping
- One piece 36″ long
- Two pieces 3″ long
- 2 Pipe tees
- 2 street Elbows
- Close nipple connectors (2)
- Four-floor Flanges
- Measuring tape
- 11/4″ Trim Head Screws
- 11/4″ construction screws
- Wood Screws
- Wood Glue
- Wood Filler
- Sanding Blocks
- Stain
- Polyurethane
- Heavy duty Picture Hangers 2
- Wine Bottle (Optional)
Tools Needed To Build an Industrial Wine Rack
- Miter Saw
- Screwdriver or screwdriver attachment for drill
- Shop-saw
- 1 1/4″ paddle drill bit
- Drill
- Impact Driver
Take a recap of your tools and material list after collecting it.
After you read or watch this amazing tutorial you will be able to make this Wine Rack in one day. Okay, maybe day and a half if you take some breaks likes me.
Let’s get started on this.
Step By Step Instructions On How To Build an Industrial Wine Rack
Step 1: Cutting and Furnishing Scraps
First, take a glass of wine and then start working calmly. Ok! Done? Now you are ready to do it. And now, you need to measure different sized pieces by using measuring tape.
Pro Tip
Following the saying “Measure twice before you cut”, Measure these pieces carefully two times and mark your measure with a wood pencil.
- Take the scraps or wood pieces of 1″x6″ and cut them at below-mentioned measurements:
- Cut eight of those pieces 17″ long, two pieces 24″ long and two pieces 33″ long by using Miter saw.
- Take the scrap piece of 1″x4″ and cut three pieces 44″ long using your miter saw.
- Take the wood piece of 2″x4″ and make one piece of 44″ long.
- Make two pieces of 44″ length from the wood piece of 1″x2″.
All I did here was cleanly cut it.
Pro Tip
- Dropping your miter saw blade on the wood or scrap piece too fast can be dangerous and it can likely result in a rough cut or splintered wood. This is especially true when you are cutting thin, narrow pieces. Give the motor a few extra milliseconds to reach its full speed, and then lower the blade slowly as you cut.

Now you have 18 assembled wood pieces to move forward in your project.

Pro Tip
- After all the cuts done, you can stain the wood pieces. Black walnut stain can be a better choice in order to tie it in with the rest of our decor. It makes your wood pieces look great before the completion.
Now it’s time to make these boards turn into an actual wine rack.
Step 2: Turning the boards in Wine Rack
After cutting, now it’s time to place the pieces together for the board of wine rack.
Take eight pieces of having 1″x6″x17″ measurement and place these pieces in a row and then place two pieces of 1″x4″x44″ across the top and bottom like shown in the image below.
Pro Tip
- Everything is going good! Here I would like to recommend you to stain the pieces before placing them. But it’s not necessary, you can move forward without staining as I Did.

After doing that, again, take two pieces of 1″x6″x24″ and place them over the top of both ends as shown in image.

After that I took two pieces of 1″x6″x33″ and again placed them across the top and bottom of the board.

Check the corners to make sure that you have placed the pieces equally and securely.
Now use the screw driver and screw the bottom and top layers of the board safely at various points. Here, you have to make sure that screw get through the both pieces of top and bottom board.
Important
- You can also glue you board but that is not a fine step as doing this will take much time and also it take time to dry the glue. So, screwing the boards will be a fine move.

Now flip this board over. These scrap pieces got an amazing shape! I just love it how fast this project moving to its completion. Obviously Instant gratification!

Step 3: Making Shelf and Staining
Now mark at two points at 9″ up from the bottom of each point on the board.

Now take a piece of 1″ x 2″x 44″ and place it on the board by matching your marked points and screw it there at several points with the help of screw driver. Then Grab the wood filler at the points where screws putted.

Now, take two pieces of 1″ x 2″ and 1″ x 4″. Put the one of 1″ x 4″ on the other one and screw it using screw driver. Take a 2″ x 4″ x 44″ and place the other piece you adjusted before, on it and screw it too at different points as shown in figure. Then grab the wood filler at the points where screws are putted in.


After this step, I sanded everything this with the help of sand block and then stained everything.
It looks great!


Once the stain has dried, apply Polyurethane to protect both the stain and the wood, and to make the final results look even more beautiful.

Once it got dried, place the smaller piece across the framework with the gap of 1/2″ as shown in following images.

Now screw this piece exact on this position, from the back of the board, by using screw driver and construction screws. Make sure to secure the small piece on the gap of 1/2″ from the other piece which is screwed on board before.

Now you are getting closer to your final product.

It’s looking awesome! Having a great time? Obviously, Yes!
Go ahead to completion.
Step 4: Pipe time
Last step was to build a shelf and to make your board more awesome after its furnishing. I took the easy route. Now, you have to use your available pipes to make a little nice arrangement which also looks amazing.

Screw all them together.

Screw again as you have two of all those pieces.

Now you have two tee-shaped pieces. Connect both of them by using another 36″ long piece of pipe as shown in blew attached images.


Now it looks like this.

Now place it across the shelf, make sure that it’s evenly place from both sides of the shelf.

Secure it using construction screws with the help of screw driver.


Now your wine rack is almost done. Flip it over and place picture hangers and screw them on the both corners.
Pro Tips
- It feels so secure if you used to screw it to attach it to the wall instead of using picture hangers.

And yes! It’s done.

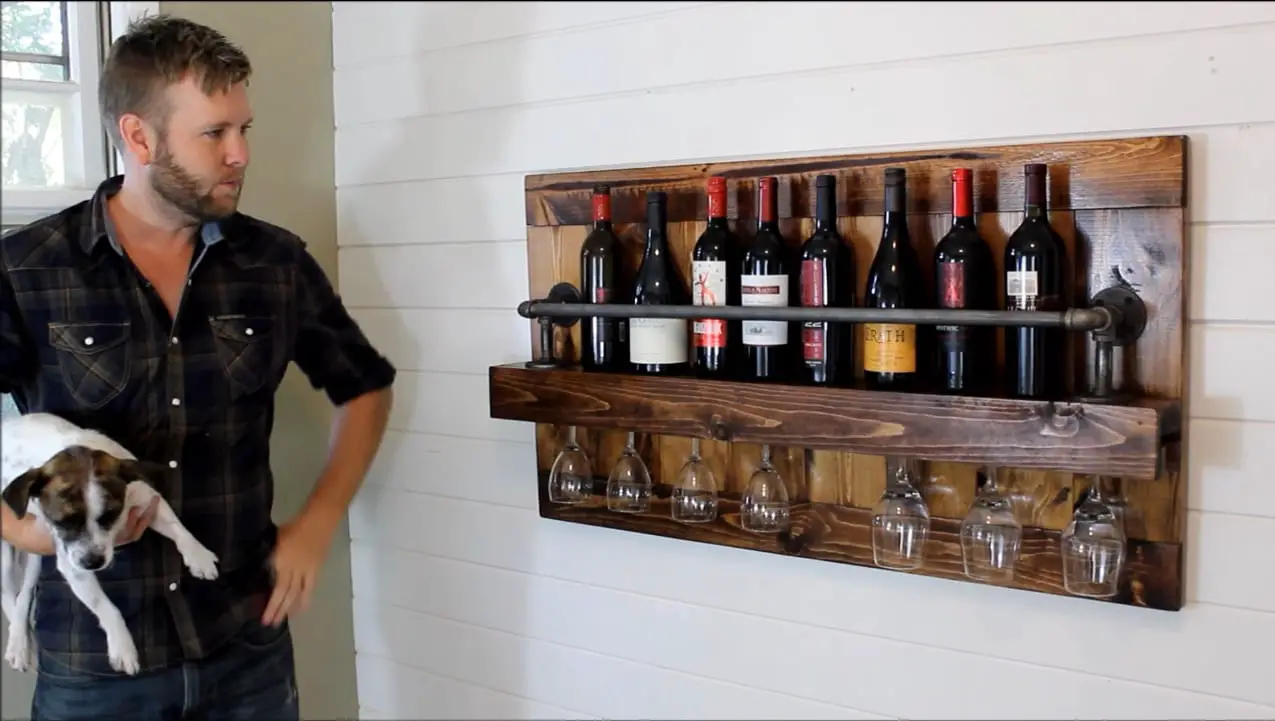
And that’s it! Here’s the final product. Looking pretty awesome?
I have done it! If I can do this you can too for sure. Now I have a wine rack that can hold 8 bottles of wine. Since I used the material that I already had lying around, so it cost me $0! I just need to make a few more now.
Watch here video tutorial for Industrial Wine Rack.
I suppose this is a pretty universal gift that any family should want to be able to get some use out of. If you are searching for some quick and easy DIY, then I will definitely recommend you this awesome wine rack project.
We do have a free set of plans available if you would like to make your own.
Conclusion
So there you have it! I look great and Sexy! You don’t any need complicated tools to complete those stylish wine racks that boast of simple designs and sufficient storage space. So it’s time to put your basic skills to the best use by constructing some extraordinary wine holders with all the reclaimed wooden stuff lying in your store for ages.
If anyone is interested in more specific direction, just let me know. I think these projects may not the most detailed DIYs ever posted. What do you think of the final product? Wanting more pallet projects? Keep visiting us for more awesome DIYs.
