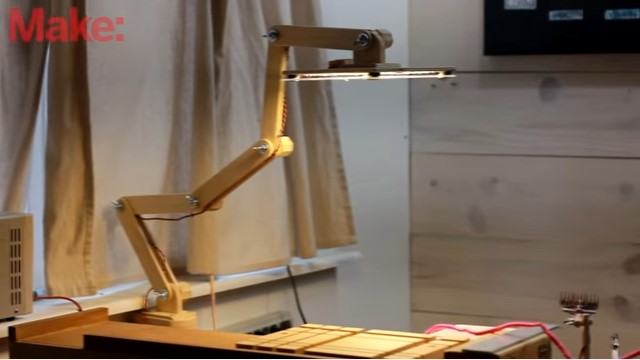
This tutorial will teach you to make an articulating led task lamp for yourself. The main benefits of this lamp it is movable so you can easily adjust it according to your need and it is portable so that you can install it in different places. The led panel can also be replaced so as if you need to have a bigger or smaller panel you can easily install it in it. This can also be bought from the market but making it yourself will save cost and also if you are a professional you can make these to sell out too.
This tutorial is for professional as well as for people who want it to do as a DIY project. This is advisable that you have working experience in wood crafting or know how to operate the tool so that you may not get injured as wood crafting tools have sharp blades etc.
We will be using Baltic birch plywood for this project. This type of plywood is known for its excellent strength and stiffness properties so in an application where strength and rigidity are required it is best to use.
Once your tools and workbench are set you can start building this project.
Follow the tutorial step by step to make this stylish and awesome led task lamp.
Step by Step Instructions To Build an Articulating LED Task Lamp
Step 1: Cutting Out Led Strips And Wood Pieces
First check out the dimension for the place where you want to have your task lamp, the height, and width of the panel.so measure how large you want your light lamp to be
Then cut out your led strips you can cut led strips after 3 lights on the copper section so I am cutting 9 lights wide strips for the panel and in total about 18 of such strips now place them like this and measure the total side

Now or the body using Baltic birch plywood cut sections on the table saw and then cut shorter pieces on the miter saw.


The whole body of the lamp is made up of these small sections

So after cutting these shorter pieces round the corners by cutting them through a band saw

I have cut both ½” and ¼” thick pieces of plywood because the ¼” pieces will be placed on sides of ½” pieces like this
And then it will be secured with a knob. Now for placing the knob, we will drill a hole on each side.


Pro Tips
- Use a workbench to secure the lumber so that it doesn’t move while cutting
- Use the drill machine carefully to ensure safety
- Always wear safety glasses and goggles
- Wear proper hearing protection like ear muffs
- Wear gloves to protect hands from splinters while cutting wood but not near rotating blades where gloves can catch
- Use a sharp 2H pencil for proper marking on the wood
- When using a table saw to cut the wood, keep the blade a little high for a cleaner cut
- When cutting LED Strip Light it is very important to cut only on the given cut line between the copper dots. If you have cut it through or before the copper dots it will result in no electrical conductivity in that section
- Cut the strips by a pair of sharp scissors
- Working with Baltic birch plywood will cause slow cutting as it is harder and denser
- The outer layer of Baltic birch plywood is very thin so you can easily sand through it without knowing so be very careful while sanding it.
Step 2: Making The Knobs And Placing Screws In Them
So now for connecting the sections together, we need knobs. There are many methods to draw them but I am using angle bisecting method using compass and straightedge to draw octagon and straight edge
Angle bisector method is to divide the angle into equal angle without measuring them. This done by placing compass and drawing an arc across both rays by placing compass tip on the angle vertex of angle. After that place the compass where the arc intersects the ray and draw an interior arc. Now, place the compass on the point where the arc intersects the second ray and draw another interior arc intersecting the first one. Now draw a line connecting the vertex to the point of intersection of both arcs.

Now to place the bolts we need hole in the center so we will drill holes in it. First, drill a large and shallow hole and then a smaller hole all the way through.

After that cut them all out on a bandsaw

Sand them and then hammer to insert bolts through them.

Pro Tips
- While working with band saw wear hearing protection such as ear plugs or ear muffs
- Appropriate clothing must be done while working with band saw. Do not wear long sleeved or loose fitting clothes that could get caught in your work
- Regularly check and adjust your blocks and wheels in your band saw so that your blade resides in its proper position
- Turn your band saw on once the motor attains its full speed then start any cutting
- To begin hammering, grip the hammer firmly in the middle of the handle like you are shaking hands with your hammer
- Don’t hold the hammer too tightly
- Use a wood drill bit which has a centering tip. You can also use a twist drill bit for normal holes having small to medium diameter
Step 3: Making The LED Panel
Now remove the tape on the back side of the led strips and stick them onto the panel of wood in a row

On the corners of the panels, we will attach magnets so mark where they are to be placed

Now strip some wire and stick it down with hot glue on each side. After that pre-tin all of the positives on one side and all the negative on the other side

Now cut a bunch of small wires and solder each connection point to long wire through this piece so as to complete the circuit. And then check it by giving supply and if it works your panel is ready.
Pro Tips
- Never touch the tip of the soldering iron as it reaches temperatures of up to 400°C
- Return the soldering iron to its stand when you are not using it
- Work in a well-ventilated area and keep your head to the side of the smoke fumes
- Always Wear protective goggles
- Always Wash your hands after you have done soldering.
Step 4: Joining The Magnet And Acrylic Sheet
Now stick the magnets on each side of the panel and then place the acrylic sheet and detaching washer on its side that covered with contact, also attach washer on the other side to give a cleaner look.

This will hold the sheet in place quite perfectly

Now the other use of the magnet is that if we attach the one complete all the way to power plug to led then if we have to replace the panel that would be difficult so we will attach the wire to a magnet box this would connect to the led wires by another magnet box so it will be easy to replace the panel whenever we want to.

So drill holes in a small block of wood, first a larger shallow hole and then a smaller hole. Pre-tin the wire and solder it to the magnet and thread the wire into the hole and tap the magnet in its place.

Repeat the procedure and the two block will come to join like this

Pro Tips
- Carefully solder and do not use very heated solder as heat can destroy magnetism of the magnet
- Choose a suitable tip for soldering iron.
Step 5: Connecting The Parts
For the led panel we will connect a piece on it and an another piece with curved top connected to the arms with a bolt so it can move

So take two pieces of plywood and connect one in the center of the other

Similarly, on the base a fixed piece connected to the wall on top of a curved piece secured with a bolt so the top piece can move easily in any direction and on top of that place similar piece as on the led panel one to connect it to the arms

Now glue some pieces of plywood together then sketching out some smooth corners so the pieces could move freely. Then cut a hole through them so they can be connected with a bolt like this
Press the pieces together tightly so that the stick together firmly


Do a little adjustment on the bandsaw and it’s smooth and fine.
Now find the center of the panel board and connect the connected part with contacting cement on the center of the panel like this

Pro Tips
- When marking a line, hold the pencil such that there is no space between the pencil and the measuring device.
- If you are using a tape measure, be sure to hook its one end firmly to the wood’s edge.
- In order to find out the center of the wood board, place the measuring tape across the board width such that each edge of the wood coincides with a whole number. Mark the middle point and that is your center.
Step 6: Wiring And Finishing
Drill a hole in the panel board and fitting the wire connected to the magnet. Then solder the negative wire to the negative side and positive wire to the positive side.

Now put all the pieces of plywood together through combining them in the sequence and connecting with bolt like this


Hot glue the magnet connection on the back side of panel then for the wire to be connected through the whole body we will attach tiny eyelet hooks two in each section. For this, we will pre-drill hole in it before we assemble all the parts and then pass the wire through this all the way to the base .twist the wire to have a neat look.

We have applied shellac wood polish on the plywood because it give better protection and it dries quickly so it is great to apply.
Pro Tips
- Test the polish on a small part first to check if you get the desired result
- Pour some olive oil in the bottle and shake it well to emulsify it.
YouTube Video
Here is the link to the source YouTube video that inspired and helped us to write this wonderful step by step tutorial for building an overhead articulating led task lamp:
This video is created and uploaded by Linn from the Darbin Orvar channel on you tube. This channel is to teach people so that they can learn to make the technologies in their life by their own.
I hope you like this tutorial and it has been helpful to you. Don’t forget to let us know about the review in the comment below. Share this with your friends on social sites by clicking the share button below and also visit our YouTube channel and out another tutorial.
Additional Links:
