Most woodworking projects require the use of straight boards. However, you are bound to encounter a project that requires bent wood sooner or later. This is especially common if you are into making furniture. Bent wood gives a unique kind of look and feel to a product that straight boards can’t create.
Knowing how to bend wood properly greatly expands the range of designs you can work on and improves your skills as a woodworker. If you have not thought about practicing this yet, we suggest you start learning how to bend wood to make furniture today.
Now, there are many techniques for bending wood. You may have heard about kerf-cutting and the steam method. What we will discuss today is the easiest and simplest one. This is called the bent lamination technique. All you need are some basic woodworking tools, wood glue, and an eye for symmetry.
For this, you need to have an intermediate level of knowledge about operating woodcutter, miter saw, and hand saw. Project Guidelines & Step By Step InstructionsItems Needed for this ProjectStep 1: Prepare your bending form.Step 2: Cut your strips.Step 3: Glue the strips together.Step 4: Clamp the glued strips to the bending form.The Finished Product Helpful Material
Items Needed for this Project
- Wood glue
- Table saw (with zero-clearance throat plate)
- Roller (for wood glue)
- Clamps
- Scrap wood blocks (same number of pieces as clamps)
You can easily find the above-mentioned material from your nearest hardware store. As the material is very generic in nature and also you can search online as well for good rates and can buy it from there. The only thing you have to make sure is the quality of the hardware products you are buying. If the quality of the products would be good your drink table would last long! So I would suggest you buy it from one of the trusted stores.

Step 1: Prepare your bending form.
Simply put, a bending form is wood that is already bent and is in the shape you want your new bent wood to be in. Make sure that it is not too thick for your clamp. Add the thickness of the form and the wood you are bending to find out how thick your form should be.

Step 2: Cut your strips.
The wood you are bending should be a little longer than what you need because the bending will shorten it.
Start cutting the strips using a table saw with a zero-clearance throat plate. We insist on the throat plate type because regular ones can cause your strips to be sucked downward through the throat plate.
Set the rip fence gauge to the ⅛-inch mark that cuts the least amount of material. That way, you get the most flexible strips your saw can help produce.
You need to move the rip fence gauge 1.75 inches for each cut to account for both the thickness of the strip you are bending and the thickness of the saw blade.
Also, cut along the straight-grained edge to make it easy for you to put the strips back later. Repeat this process until you have enough strips.

Step 3: Glue the strips together.
The next step is to put the strips back together with glue. Wood glue dries very quickly, so you also have to be fast. Have everything within arm’s reach: bending form, scrap wood pieces (same quantity as your clamps), strips, glue, roller, and clamps.
Have the stack of strips in front of you. Roll glue on the topmost strip, and then separate it from the rest of the stack. Apply glue on the next strip, and then put it on top of the strip you just separated, glued side down. Do this for all strips until they are one solid block again.

Step 4: Clamp the glued strips to the bending form.
Now it is time to clamp the strips to the form. Begin by clamping them at the center. You want to put a small wood scrap block between the clamp and the strips to prevent the clamp from denting the wood or leaving a dark mark that is produced when certain kinds of wood glue react with the steel surface of the clamp.
When the center is securely clamped, do the same thing to the left and right of the strips until the whole block is clamped to the form. Then, leave the form and the strips to dry for about 8 hours.

The Finished Product
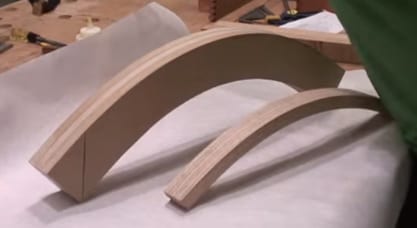
Remove the clamps after the drying time. If you followed the instructions correctly, you should have a nicely and conveniently curved wood the exact same arch of your bending form.
Helpful Material
This guide is based on this video tutorial posted by eHow.com, the world’s go-to site for anything that needs instructions.
Conclusion
We hope you learned a lot from our how-to today. Bending wood using the bent lamination method is easy, especially when you eventually get the hang of it. It also widens the range of designs you can work with.
Have you started learning how to bend wood with bent lamination and want to share your story? Let us know in the comments. Lastly, don’t forget to share this article with our fellow woodworkers. Everyone deserves to know how to bend wood to make furniture.
