If you are a raving fan of the weathered wood looks, then I bet you’ve got at least several techniques for making wood look rustic which are hiding in your sleeve. But if you enjoy the simple, straightforward things in life as much as I do, you want to find out how to make wood look old with vaseline.
The reason why I love this particular wood aging method is that it’s so effortless that I’ve managed to teach my kids how to do it after a single tutorial.
Plus, it’s also inexpensive and you will only need as little as 3 basic supplies to get started. Already in the mood to try the vaseline DIY method on just about any wood object of your choice? Well, let’s jump in!
What You Will Need To Follow This Tutorial
- Vaseline
- Paint
- Paintbrush
- Rag
- Cotton swabs (optional)
Pro Tip
1 – Don’t try to apply Vaseline evenly
In nature, no surface will wear off in a perfectly strict pattern. So why do you need to strive for perfection when weathering wood with vaseline? Don’t be afraid to apply a thicker layer of vaseline on some areas and a thinner layer on others. That will only make the final outcome even more beautiful.
2 – You don’t have to follow the grain of the wood
Following the grain of the wood helps to achieve a smooth, uniform surface where the grain itself is not visible to the eye. However, since you are working to get an awesome distressed look, you don’t have to comply with this rule.
All in all, it’s a matter of personal preferences. It’s good to know, though, that NOT following the grain of the wood will make your DIY weathered project become even more stunning.
Step by Step Instructions for Making Wood Look Old With Vaseline
Step 1 – Apply Vaseline to the areas you want to look “worn out”
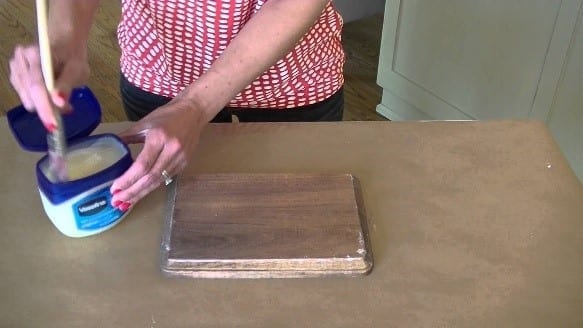
Image Credit: youtube.com
Vaseline will prevent paint from soaking and sticking to the surface of the wood. Thus, the areas where you will apply a coat of vaseline will look worn out at the end.
For a more authentic weathered effect, make sure you use vaseline on edges and corners. These particular zones tend to naturally get worn out and damaged most visibly.
Use your fingers to apply vaseline to the wood. If there are any cracks, though, you may choose to protect your fingers and apply vaseline with a cotton swab instead.
Video by Sincerely, Sara D. – Tutorial for using Vaseline to distress furniture
Source: youtube.com
Step 2 – Apply paint and enjoy the magic
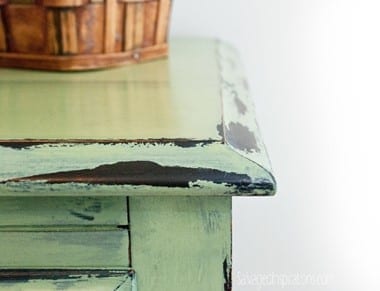
Image Credit: bookingchef.com
Once you have used vaseline on certain areas of the wood, it’s time to apply a coat of paint. Dip your paint brush in the paint and cover the entire surface of the wood evenly. Apply the paint just like you would apply it without the layer of vaseline beneath, aiming for long, controlled strokes.
Let the paint dry well but not completely. It shouldn’t feel wet to the touch. However, you mustn’t leave it to dry out thoroughly either. For me, the waiting time was less than an hour. This can vary depending on the paint you choose because of the difference in the brands.
Finally, go over the areas where you had applied vaseline with a damp rag and rub off the upper layer of paint. This process is very easy and won’t take much of your time or energy. And you’re done! No sanding?! This must be magic, right!
What an impressively easy-peasy tutorial! Do you agree? Ultimately, I think the question is not how to make wood look old with vaseline. The real question is what are you waiting for?!
If I had to point out just one of the numerous ways you can make wood look weathered as my top favorite option in terms of simplicity and satisfaction of the final results, then I’d definitely give the vaseline method my thumbs up.
And talking about thumbs up, did you show your support for the tutorial we have compiled for you? If you like what you see, you can help us spread the positive vibes to more of our DIY buddies by sharing this cheat sheet. Is there something you wish to add on the topic such as tips or any questions? Drop us a line in the comment section below. We’ll be happy to hear from you!

