Soon after I got my Bachelor’s degree in 2014 I started looking for a new home. But as my budget was very tight back then, I had to find a house for rent because paying a mortgage without a stable income can spell disaster.
Finally, I was happy to rent a beautiful house with a big yard where I could grow my favorite veggies and herbs. The price was affordable but there was one thing I could hardly swallow. The living room, as well as the kitchen, made me feel like a prisoner because of the dark paneling; however, my landlords had a strict rule.
I was not allowed to paint over the existing paneling. I wanted and needed the house badly. So I started wondering how to make wood paneling look good without painting.
Can you feel me? Do you struggle with the same issue? Then follow the tutorial we are listing below to find out how to refresh, brighten, and update wood paneling – no painting involved!
What You Will Need To Follow This Tutorial
- Fabric of your choice
- Scissors
- Staples
- Staple gun
- Chalk
- Tape measure
- Quilt batting (optional)
- Glue gun (optional)
- Hot gun (optional)
- Upholstery tacks (optional)
- Decorative trim (optional)
Pro Tips
1 – Polyester can be your best friend
I highly support living an eco-friendly life in every possible way. However, when it comes to making wood paneling look beautiful with the help of fabric, your wisest move is to opt for polyester fabric. Polyester fabric is budget-friendly and comes in many colors and designs. Most importantly, polyester is easy to maintain as it is resistant to mildew and mold.
2 – Sew fabric to quilt batting in advance
If you want to create the look of wall panels, you can sew the fabric to the quilt batting before you start stapling these. Although this is only an extra tip, it can help you create a very professional and stylish design.
Step by Step Instructions for Making Wood Paneling Look Good Without Painting
Step 1 – Measure the area you are about to cover

Image Credit: limaonecapital.com
First off, you need to decide how much of the wood paneling you want to hide with the fabric. For example, you may choose to cover as little as ¼ of the wall. When buying the fabric, as well as the quilt batting, always purchase about 10% over than the size of the total area you are about to cover.
This is the best way to avoid unpleasant surprises later on. Even though quilt batting is optional and you can make wood paneling look good by installing only the fabric of your choice, the effect with quilt batting is undoubtedly more impressive. Nevertheless, the surface of wood paneling is not smooth enough and the lack of quilt batting can make the entire set look less uniform.
Step 2 – Staple the fabric and quilt batting to the wall
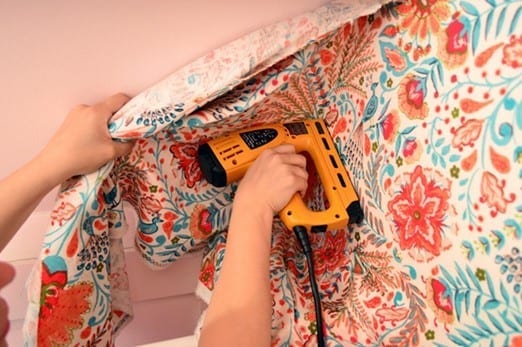
Image Credit: younghouselove.com
For a start, use sharp, large scissors to cut the fabric and/or quilt batting after measuring the surface you want to cover once more. If you have decided to go for both fabric and quilt batting, you will need to start with stapling the quilt batting.
Start from the top and staple carefully with a staple gun. While working your way from the top to the bottom, don’t forget to smooth out the quilt batting to make sure there are no wrinkles. Secure the quilt batting well, and add a few staples in the middle if needed.
Repeat the same process when stapling the fabric.
Step 3 – Decorate and upgrade the fabric-to-wall wood paneling design (if desired)

Image Credit: leeparkerinc.com
Good job, you are (almost) done! You can quit here or you can upgrade your new wood paneling decoration by fashioning an upholstered look. For this purpose, use upholstery staples and create patterns of your choice, such as diamonds or squares. Use a hot glue gun to hide the staples with decorative trim if desired.
I can’t help it but admit that I felt so happy and proud once I finished decorating the old, annoying wood paneling with the method we just shared above! I love this particular DIY project because it is easy, funny, inexpensive, and you have plenty of room to experiment.
Nevertheless, you can keep upgrading it with time. Did you enjoy this tutorial as much as we enjoyed compiling it for you? Show us your support by liking and sharing this article! We’d love to hear from you in the comment section below.
