Did you just buy a table saw or drive saw and are wondering what to do in order to make perfectly straight cuts? Are you unsure of what exactly a rip fence is and how to use it properly? Working with power tools such as a saw can lead to such queries and this is especially true when you are working with them for the first time. In fact, I was near clueless when I first tried using a rip fence!
Therefore, it would be best for you to know the answers to questions such as What is a Rip Fence and How to Use It before you start sawing away with the help of a rip fence. Not only will it help you get those perfectly straight cuts for your woodworking project and needs but it will also keep you safe with proper working knowledge.
The Six Materials You Will Need To Follow This Tutorial
Before starting to learn how to use a rip fence, you will need the following general materials to get you started.
- A rip fence
- A piece of wood (for beginners, preferably those with large dimensions to make it easier to handle)
- A saw (whether a table saw, a drive saw, or a circular saw) that can use a rip fence
The materials are the basic ones you will need to start using a fence. The choice of whether to use a metal rip fence or a wooden one depends on the kinds of saw that you will use. Table saws often use a wooden rip fence but can also accommodate a metal one while hand held saws such as drive saw only use a metal rip fence.
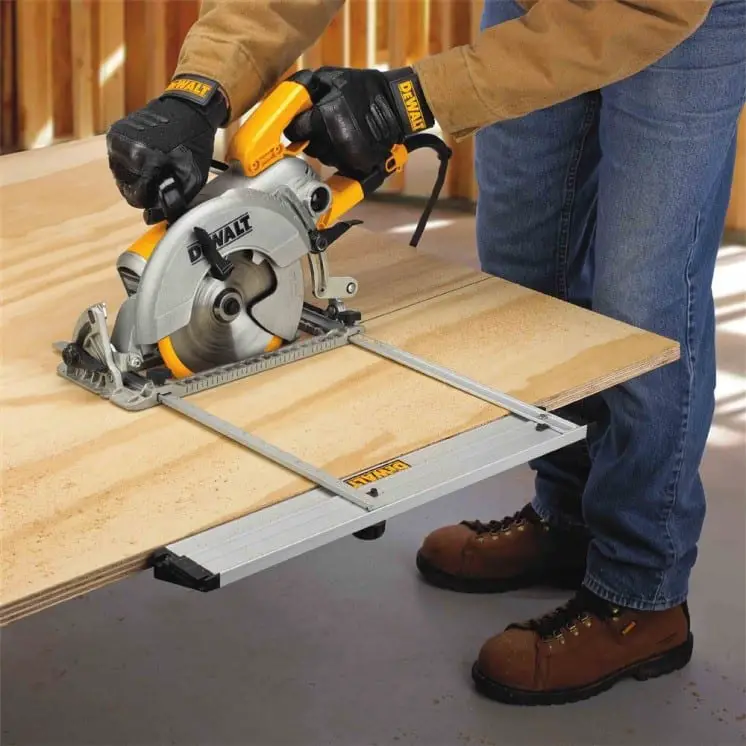
When it comes to the kind of saw you will use, you will have many options as a rip fence can be used in different types of saw such as the table, drive, and circular saw.A table saw refers to the complete set-up which includes a saw, a base or table, the motor and arbor assembly, and the rails, fence or miter gauge.On the other hand, other types of saws such as a circular saw or drive saw are handheld saws that have slots to accommodate rip fence attachments.
Choose whichever type of saw is preferable for you or available for you to use.Whether your rip fence is a part of a table saw or an attachment to a handheld saw, using it will be more or less the same and will require you to follow certain instructions and safety procedures in order to achieve the best results possible.
Step-By-Step Instructions For How To Use a Rip Fence
Step #1: Set Up Your Saw

Before you start using your rip fence, it’s necessary that you set up your saw. Now, this may be as easy as taking your handheld saw out of its package or as hard as setting up the table saw with the instructions it comes with. Either way, set up the type of saw you have and make sure that it is operational and all the parts are intact and in place. Double check with the manual on how to set up and operate the saw and what tools are included in the package
Make sure that you have the rip fence attachment for the handheld saw as it may not be included in the package. On the other hand, table saws usually come with some sort of rip fence. If not, use spare wood that you can DIY as a rip fence.
Step #2: Make Sure The Saw Is Unplugged

Making sure that the saw is unplugged or powered off is the first safety guideline you have to observe. This is absolutely necessary and if you aren’t sure if your saw is unplugged or not, double check to make sure it is unplugged. This is safer as opposed to just merely turning off the saw as it can suddenly turn on by itself or due to you accidentally pressing the on-switch.You don’t want to attempt to attach the rip fence attachment or align it and have the saw suddenly turn on as this can lead to serious physical injuries. This safety precaution also applies whenever changing the blades or adjusting the rip fence.
Step #3: Insert Or Mount Your Rip Fence
The rip fence, whether it is mounted on a table saw on inserted in a drive saw, is used as a guide in order to achieve the length, width, or type of cut that you prefer to make on your wood. It is usually made out of metal, especially in drive or circular saws, but they can also be made out of wood as is usually used in table saws.
Insert the rip fence in the slot in the circular or drive saw. The slot for the rip fence is located at the front of the saw and can be easily found by looking at the side of the saw. On the other hand, the rip fence on a table saw is merely mounted ontop the table or base to the right of the protruding circular saw.
Step #4: Align Your Rip Fence
This step applies whatever type of saw you have as this will dictate how long or how much wood you will saw off. This is easier on handheld saws as this is merely the short process of pulling out or pushing in the rip fence to your desired length. A rip fence for handheld saws usually has measurements on the longer end to make it easier for you to measure out your desired length.
On the other hand, you will have to manually measure the length you want to align the rip fence on a table saw. As an additional step for table saws, slowly raise the saw protruding from the bottom of the table to ensure that you will only cut what you need.
Step #5: Secure Your Rip Fence

Securing the rip fence is easy on both handheld and table saws. Screw in the rip fence onto the foot of the saw or onto the table to secure it and make sure that it isn’t in the way of the saw’s lower guard in cases of circular saws. Other handheld saws will make use of wing nuts rather than screws in order to secure the rip fence.
Securing your rip fence is necessary as it allows you to constantly make straight cuts. Having an unsecured rip fence will cause it to move around and may cause you to make wobbly cuts which may lead to the ruin of your woodworking project.
Step #6: Use The Rip Fence As A Guide While Cutting
With the saw secured properly, aligned to your desired measurements and turned on, slowly move your handheld saw or, if you are using a table saw,the wood piece away from you. Stand firmly and keep your grip on your saw or wood piece tight to ensure that it doesn’t go careening away on its own.
While cutting, make sure to keep your arms and fingers away from the blade to avoid injuries and make sure to keep a tight grip on your saw or wood piece until you are finished cutting the whole length or width of the wood piece you are working on.if you want to move on to a different length or type of cut, turn off the saw first before adjusting the rip fence.
Step #7: Observe Proper Safety Guidelines

You will be handling a power tool in conjunction with using a rip fence. This means that it is necessary for you to observe certain safety guidelines to ensure that you don’t sustain any injury while using it. Certain safety guidelines include wearing goggles and a dust mask to protect your eyes and lungs from the dust or other flying debris. In addition, wear clothing that is not too loose and doesn’t have long sleeves as this can lead to your clothing getting caught on the blade of the saw.
Furthermore, be attuned to your saw and immediately stop working if something sounds off or weird or if your cuts are not turning out straight. Turn off your saw at once and check its different parts to see what may be causing the problem such as stuck wood pieces, rusty or un-aligned parts, or debris build-up.
Did you find the instructions helpful? It’s normal to be daunted in using a rip fence while operating any type of saw for the first time. I was too when I tried it out! However, it got easier as I kept using it and if you follow the before-mentioned instructions, you will soon find that it isn’t as hard as it seems, openingyou to a world of possibilities in wood working. If you have more thoughts or questionsabout rip fences and how to use them, leave themin the comments below. Share this article as well if you liked it to let other people know what a rip fence, how useful it is, and how easy it is to use.
Sources:
- http://www.rockler.com/skill-builders/setting-up-your-shop/table-saw-terminology
- http://www.doityourself.com/stry/how-to-repair-a-table-saw-arbor
- http://www.instructables.com/id/DIY-rip-fence-for-saw-bench-1/
- http://www.finewoodworking.com/2009/04/01/safety-manual-tablesaw
