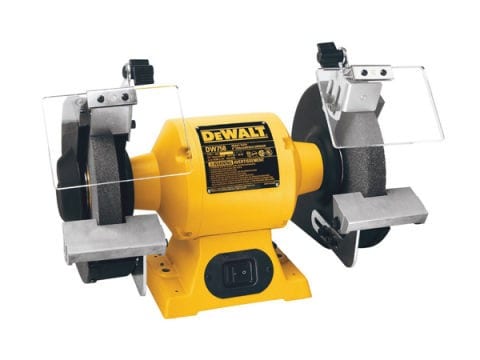
A bench grinder is an abrasive power tool made to grind down every work piece it encounters to the specifications of its owner. Depending on the wheel that’s being used by the machine, it can clean, polish, buff, sharpen, or shape just about any metal or wooden object. They’re commonly utilized for hand grinding cutting tools to sharpen them or even making new tools or fasteners out of raw metal if you’re skilled enough to use this machine that way.
What You Will Need
Here are the objects and materials you need and why you need them to get started.
- The Bench Grinder Itself: You can’t grind without it. Buy a good one that secures itself solidly on the bench to avoid excessive vibration and uneven results.
- Tool Rest: Use the one that came with the machine or buy an aftermarket one that’s more adjustable.
- Grinder Wheels: You can choose between 36-grit, 60-grit, and 100-grit stones.
- Buffing Wheel: A wheel that can hone blades and buff up waxed wooden work pieces.
- Space: It’s not only the final frontier. You also need more than just elbow room in order to move metal tools and wooden objects to and fro the grinder wheel.
- Pot or Bucket of Water: This water will serve as your means of cooling down a friction-hot piece of wood (or metal if you’re also using the grinder to sharpen your tools).
- Gloves: This will protect your hand from wood that’s been grinded so much it has heated up from the excessive friction.
- Safety Glasses: These glasses will allow you to see what you’re doing without worrying about sparks or dust flying to your eye.

- Steel-Toed Shoes: This will protect you from falling hot debris that could burn or break your feet and toes. Actually, any shoe or boot without open toes will suffice.
- Ear Plugs or Muffs: It can get noisy when working the grinder, so protect your ear drums from noise damage with these items.
- Face Mask: This will also protect your lungs, throat, mouth, nostrils, and face from the fine particles of grinded wood debris flying all over the place.
- Work Pieces: You might have some wood lying around your shop that you want to cut, smoothen, or shape.
- Wedge: You can also use the grinder to sharpen your different wedges.
Step-by-step instructions on how to properly grind with a bench top grinder
The Basics
Many amateurs or beginners have issues with the bench grinder. They give up on it easily because it’s too hard to use. Sometimes, they end up with uneven results. Other times, they burn the tip blue with the high friction grinding. However, just follow these steps in order to learn how to grind the right way with this grinder. First, before turning on the grinder, you should do a safety check first.
Make sure the grinder is secured on your bench to keep it from vibrating so much that you’d get those aforementioned uneven results. Check the tool rest in order to make sure it’s in the place on the grinder. The tool rest is where you’ll put the metal (usually the tool or work piece) or the wooden item as you grind it to the proper shape, sharpness, and smoothness. Watch out for excessive grinding though.

Preparations Continued and Safety First
The tool rest should be put into the correct place so that there’s a 3 millimeter or ⅛ inch space between the grinding wheel and the rest itself. The area you’re working on should be clear of debris and objects. You should have enough room to push the wood you’re dealing with back and forth on the grinding machine. Get a bucket or pot of water for good measure near you to douse flames.
This container full of water will cool off any wood that goes on fire when you grind it. On that note, get some safety gloves for good measure to keep your hands from burning when dealing with burning wood and whatnot. Also wear a face mask, ear plugs or muffs, steel-toed shoes or no open-toe shoes, and safety glasses to protect yourself from the dust. Keep away from debris too.
Turning the Bench Top Grinder On
Turn the grinder on then stand to the side until it reaches its maximum speed. Don’t use it right off the bat. Afterwards, work on your piece of wood by moving it directly on the grinder wheel and holding the work piece tight with both hands. Don’t hold it lightly or else it might fly off.
Push it slowly towards the grinder wheel until it touches the edge (don’t let it go too far or else you’ll rub it out like an eraser). Don’t allow the wood to touch the sides of the grinder at all or at any time, because this will damage the side. Only the front of the wheel should be in contact with the work piece and do the grinding. Its sides could end up with holes or cracks if you put the wood on there, thus ruining it.
How to Shape or Buff Wood
In regards to shaping a piece of wood properly, it involves touching the wood to the grinder at the area where you want it to carve. Do this in a gradual manner. Use a back and forth motion like when attempting to grind off a part of the wood off. A grinder makes it easier to smoothen up the surface of the wood you’re attempting to chisel more than your hands and a chisel would.
You can avail of a buffing wheel in order to buff up your wooden work pieces on grinders with a slower speed. These wheels are normally used to hone a razor edge on carving tools (more on this later), but you can use a 1,725 RPM bench grinder to buff up your work piece by applying wax on it then buffering the finish after the wax has dried.

How to Cut Through a Work Piece
Before anything else, don’t hold the work piece in place against the grinder for too long, because this heats it up quickly and damages it. This will also reduce the risk of the wood catching fire from excessive grinding. With that in mind, let’s talk about cutting through wooden pieces. This involves holding the wood onto the tool rest and turning it gently towards the grinder surface.
After it makes grinder contact on the spot you want the cut to happen, keep turning the piece until it breaks in half. Make sure you hold each end up. After you’re finished, check the results and smoothness of your work. Don’t put the work piece in place and wait until the grinder cuts through that one spot. This will result in a terrible and unclean cut with a work piece that might catch fire.
How to Sharpen a Chisel
Again, use the tool rest to its fullest extent by resting the work piece on it as you attempt to sharpen it up. From there, hold the chisel securely with both of your hands. Afterwards, push the chisel blade slowly to the grinder in a way that it’s angled slightly up or down in accordance to how the blade tapers off. This will make the grinder grind correctly without overdoing it.
Again, the forward and back motion will aid you in shaping the chisel. However, unlike in the case of metal shaping, you should actually avoid making the tool heat up with friction so much it turns orange. Sharpen it up then when it gets warm dip it in the water to temper it. Just rub the blade across the grinder to avoid warming or cutting the blade apart and you’re good to go.

How to Dress the Grinding Wheel
Whether you use your grinder for sharpening your woodworking tools, cutting/shaping/buffing wood, or grinding away rusty metal, the grinding surface of the wheel will flake off. This then results in the machine clogging with fine “swarf” or the powdered material of what once was the grit of the grinding wheel. There are also times when the wheel is worn unevenly or at an angle.
Your grinding habits are what caused this. It’s therefore of the utmost importance to clean out the grinding surface with a dresser. This allows you to give the wheel a fresh edge in a few moments (instead of you having to buy a whole new wheel). To use this, adjust the tool rest 90° then hold the dresser flat on the wheel surface. Turn the grinder on then move the dresser across the wheel to smoothen the surface.
Conclusion
To properly use a grinder, attach the wheel that works for your job. The roughness of the wheel depends on what you’re grinding. Gardening tools and wood require a 36-grit wheel. Plane irons and chisels require 60-grit wheels. Delicate jobs like peeling potatoes and shaping metal model parts should be reserved for 100-grit wheels. In general, you may need to place the item to be grinded at a 25° to 30° angle then keep it moving in the aforementioned back and forth motion. For specifics, check the techniques outlined above.
