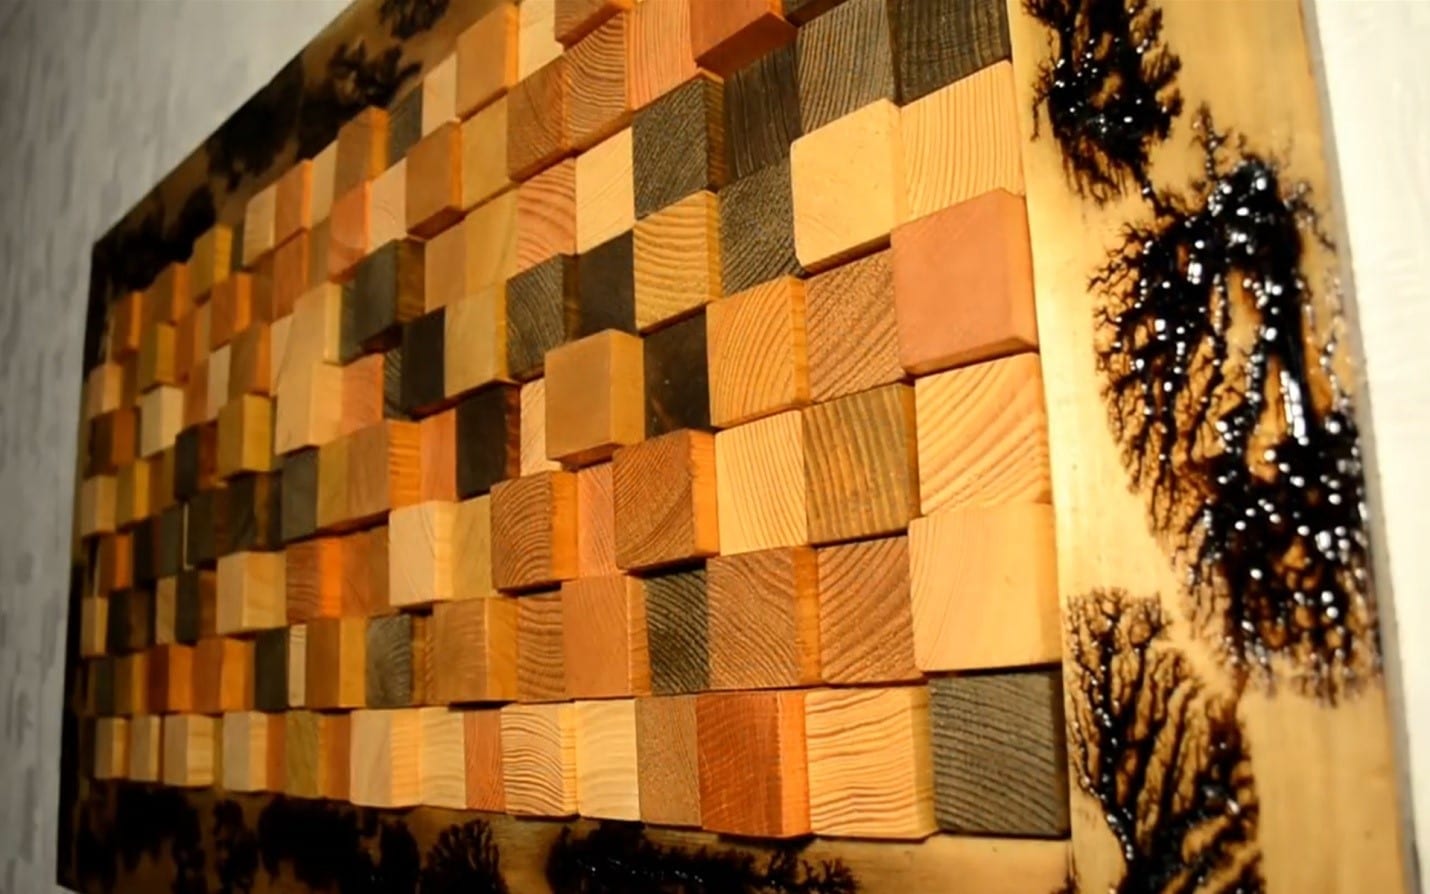
Planning something new that can enhance your interior home décor? Feeling bored from your room’s white flat walls? Looking for some cool ideas about how to decorate it? Didn’t find any satisfying wall covering project? Don’t worry, today, we are going to introduce you a DIY wall panel which can bring your wall to life. This wood 3D wall panel is a crazy and fashionable wall covering in modern wall designs. This awesome wall design brings an elegant look to your wall. To get more sparkle result, you can use some creative lighting.
Sometimes, creating just a little thing and adding it to your room can completely change the look of your room.If you are wondering about decorating your room and want to add something to it that can make a big statement, but also you don’t want to spend much, this project will help you to add an elegant piece of wooden décor to your room.
This wood 3d wall is not only easy to DIY but also it’s not much expensive.
DIY Reclaimed Wood 3D Wall Panel
Whether you want to give your living room or bedroom a little rustic charm, you need to build a wall that is in desperate need of a paint job. Also, if you are looking for something different for your room décor, these walls are simply perfect for your room.
Even if your room’s wall has a good shape, try to consider something that can give a better look to your room’s wall. You will just need a few pallets or reclaimed wood to build this 3d wall panel. It’s a pretty easy project that you can finish in a weekend. And also, It is just absolutely gorgeous.
This wall panel is not only beautiful but also it is not that expensive. In fact, if you have few reclaimed wooden pieces or you know that where you can get them free, and also having some basic woodworking tools, you can literally build this wall panel for free.
When I saw this wall panel first time at my friend’s house, I was just like “Wow! Amazing! I could build one for my room.” Then I decided to build this 3D wall panel with the help of some pallets I have had.
Items Needed for this Project
Some materials and instruments/tools that are necessary for this project are as given below:
- Handsaw
- Circular saw
- Jigsaw
- Table saw
- Measuring tape
- Pencil
- A Fence
- Wood Glue
- Screws or Nails
- Screwdriver or Hammer
- Wood Filler
- Stain
- Sanding blocks
- Polyurethane
- Some wood Pallets
What’s more, you can build this in less that a day. You can also paint it with different colors to match it with your existing wall paint. Grab some reclaimed wood or pallets this weekend and let’s start building this beautiful 3D wall panel for your room.
Step 1: Collecting Wood Pallets and Materials
First of all, you need to collect all the materials and tools for your project before starting any project. So in this project also, you need to get some pallets or scrap wood or wood boards from a source where you can get them free and take them to your working place.
The pallets I have had, I got them by passing a wood store. They are about to throw these pallets out. You can also get them from any woodworking store, ask them for some free pallets and bring these pallets to your working store. Or, if you have already some pallets left in your home from some woodworking projects that you have completed before. Take all those pallets and scraps and cut them to the desired measurement to form a new 3D wall panel.

Also, before starting the project, you should have to collect all the tools that are necessary for this project (the tools list is given above). And then start the work, as I did, start cutting the scraps with any type of the saw, I used a miter saw to cut these pallets that I have had.
Before cutting the pallets for moving further into the project, you can do sanding of these pallets or boards. Sanding makes all the boards and pallets clean and neat and also flat the surface of these pallets. This will also help to give a better look to your wooden piece and also will help to work cleanly.

Pro Tips
- If you don’t have wood pallets, then first try to get them free from a friend or store, if not you should buy them from a source where they cost you less.
- Sanding the pallets before starting the project will give a shiny look to your panel frame and also you can go on cleanly with your project.
- While taking wood boards or pallets, make sure that boards or pallets are not damaged, because it will create a problem when you cut them out for panel frame.
Step 2: Cutting and Shaping Boards or Pallets
After, collecting the pallets and sanding them, now, this was the time to cut all these boards to the desired measurement. You can cut the pallets to the measurement to that you want the pieces of your 3D wall panel to look.

Any type of saw, a handsaw, circular saw, or a table saw can be used for cutting out the boards. I have used a circular saw as you can see in the image above, and cut out all these boards to my desired measurement. Cut two pallets of the same measurement, and two more of the same length, but not same to the twos you cut before. You have to cut them with respect to the measurement you want. I hope you will get enough help from my tutorial.
After cutting all these pallets, place them in a shape as I did, you can see in the image below and carefully mark all the pallets, from the position where other pallets are placed on them. Be careful in placing the top two pallets at the corners.


Then, make a small cut at the half to the board on these pallets, from the marked position by using a handsaw or circular saw. I have used a handsaw to do this.

Now, I have used a circular saw to make some more cuts.

Then, by using the fence and a hammer, I have ripped out that little place part of the pallets.


Pro Tips
- While using the handsaw, make sure you are ripping the handsaw at the angle at 90 degrees.
- Hold the boards on the table with clamps, while cutting them.
- Before cutting, check twice the measurement of all the boards if they are same.
- While using a circular saw, make sure that your bit is sharp, smooth, and clean.
- Make multiple lights passes rather than one heavy cut.
Step 3: Making the Frame
Place all the pallets in the frame shape and glue up all the corners to secure the frame of your wall panel.

Use clamps and some weight to secure the frame after gluing and let it dry. After a few hours, remove the clamps and weight and check it if it is secure perfectly or not.

Cut out the extra corners of the pallets by using a hand saw.

Use a router for routing the frame of your panel carefully and equally from inside. A table router can also be used for this purpose, but using that can be difficult to route the pallets.

Sand the outer surface of the frame by using a sander box or sander machine. I have used a sander machine for it.

Pro Tips
- Again, you have to be careful while making a cut with the hand saw.
- While using the fence and hammer, hit the fence slowly and take a fence that is sharp.
- If using a handheld router, make sure that the workpiece won’t shift.
- Make sure you have placed the clams so tightly that can squeeze out surplus glue.
Step 4: The Back Of The Panel
After when you have created the frame, it’s time to make the back of the panel by using an MDF board. Measure the area of the frame from the position where you have routed the frame boards because the back should have to fix there. Cut the MDF board by using a circular saw. Then sand the sides of the board by using sand paper.


Put some wood glue on the routed cuts of the boards and place MDF board there carefully and let it dry. You can use light clamping and weight to secure the MDF board.


Pro Tips
- You can paint the MDF board before gluing it in the frame, it will enhance its look.
- You should use wax paper barrier while clamping. The strip of wax paper helps to separate the wood surface and clamps and prevents staining.
- Choose clamps that apply sufficient pressure on the board.
Step 5: Collecting and Setting Up Some Wood Remains
In this step, you have to take some wood remains to make some pieces that are to be settled up upon this MDF board to give the panel a 3D look. I have taken some wooden remains and cut these pieces into some small pieces of different size by using a circular saw.


Now, time to give your frame some astonishing and natural look. For this purpose, you have to burn a little part of your frame surface which can give it a natural look. I have used Lichtenberg device for this purpose. I have put two nails at desired distance on the frame and place and brushed a fuel in between them. Then, I have connected the both terminals of the device to each nail and make fire on the fuel. It really helped me to make some natural look of the board.


Let it dry to take a real look because I have to varnish it later.
Take these small wood pieces and time to sand them all. In this period of time, the frame got dried. Now, time to use transparent varnishing to cover your frame, as I did.

It’s really amazing!

Stain all the pieces of wood and let them dry. And then used colored varnish on that pieces.


Pro Tips
- While using the circular saw, make sure your bit is sharp and clean.
- Drop the bit of the saw in the wood slowly, dropping it fast can make a rough cut and damage the surface of the wood.
- Wait for the bit to get its maximum speed and then make a cut.
- While burning process, make sure you are using a low voltage device.
Step 6: Finishing the Panel
Set all the pieces into the frame on the MDF board in mixed order as I did.
Wow! You have got something stunning!

Now, pick up every wooden cube one by one and place a drop/dot of wood glue and place them again securely. When you have done, let it dry for some time.

After you are sure about that It’s dried completely, now, it’s time for transparent varnish for covering again.

After I have finished the varnishing, then it was time to make a hanging point in the panel so that it can be hung on the wall easily. I have used to heavy weight hangers to fixed them on the back of the panel’s frame.

Put two screws with the help of the drill and a screwdriver, in the wall securely at the desired distance and hang the panel over them.
Pro Tips
- Make sure all the wood cubes were secured tightly with the glue.
- Screw the hangers strongly in the frame by using two screws on each one.
Youtube Video

Stunning! Isn’t it?
It is one of the amazing stuff I have created till now. What an amazing piece of décor to add to your room/home.
A video tutorial can be a more satisfying way to understand all the steps of any woodworking project. Also, some readers prefer to watch a video tutorial instead of a written tutorial. We have managed to include a video tutorial for this project for those readers. This will help to illustrate all the steps of this woodworking project. Have a look at it
Conclusion
This weekend! You have an opportunity to build this awesome wood piece and add it to your room décor. This project will not take more than a day of your time. I have done it a little more than a half day. And also, you don’t need to me a professional woodworker. Anyone with basic woodworking knowledge and some woodworking skills can build this project easily. If I can do it, then obviously you can do it too, because I have had only a few woodworking skills when I built this one.
Also, if you have any queries or discussions about this project, you can ask in the comment section of this post. Feel free to share the images of final products of your projects.
