I know that if you are going to buy a stationary saw at a shop, the band saw is not at the top of the list. Nevertheless, the band saw is one of the most versatile tools, and a definite must have in your workshop. It is the kind of saw that can be used for several artistic woodworks, that is commonly found in cabinetry and furniture work.
What’s a Band Saw?
The band saw is a stationary tool that can be used to cut curves and edges, even in the thickest wood or lumber. The band saw can even cut several complex and irregular shapes and designs. It is truly a magnificent tool that it can even cut several wood blocks into thinner portions. You just need to find the appropriate blade to cut the material. Some band saw can even cut metals. Using the tips and steps provided here, you can master the use of the band saw in no time. The things mentioned here are from seasoned veteran wood workers, so feel free to follow the advice.
How To Get Started

First, you need to familiarize yourself with the machine and its parts. The band saw is a machine, usually two- or three-wheeled, that holds a spinning blade that does the cutting. The rotation is done by a motor built inside it. There are several companies that offer a building kit to allow new users to assemble their own band saw. Nevertheless, you can also buy a ready-made machine in several stores in your area. Band saws come in different sizes, forms, and models. You need to choose properly what model and what size is fit inside your workshop. It should be noted that there are two models available for this kind of machine: the small bench-top and the floor model. The small bench top is a model that can be placed on top of a working table. This model is also portable since it is small to be carried. The bigger version of this is the huge floor model that can only be placed on the floor. Typically, the floor model is used for bigger projects.
Before buying the band saw, you should also consider the size of the table and the saw. The table dimensions will determine how easily the machine will be able to hold and guide the wood during the cutting process. The table you should use must also be capable of being set at any angle possible. This is usually about 45 degrees. This is because the angled table can be used for removing corners of woods with large curvatures. The band saw should also have a fence so it will be able to guide the user in cutting edges and straight lines. The fence is also helpful for resawing unpolished parts of the wood.
Since the blade of the band saw can tend to shake and vibrate when in use, the band saw should have a sturdy chassis and cabinet to hold it. The body of the band saw should be able to withstand the vibration of the motor and the blade. For the small bench model, it should have a provision for bolting and screwing to the table. The floor model is the sturdier one so it may not require bolting to the floor.
Step By Step Instructions On How To Use a Band Saw
Step 1: Setup the Machine

Properly setup the machine as per instructed in your manual. The bench model should be sturdily placed on top of the table so that it would not move once the motor starts. Attach the blade firmly on the end of the motor’s belt area. Once you have secured all of these, give it a test run to see if it works properly. Remember that there are several blades applicable for different kinds of machines. Know the sizes of the blades you need that can be put inside the band saw. Sizes vary from ½ inch up to a smaller 1/8 inch. The proper use of blade will determine the output of your woodwork project.
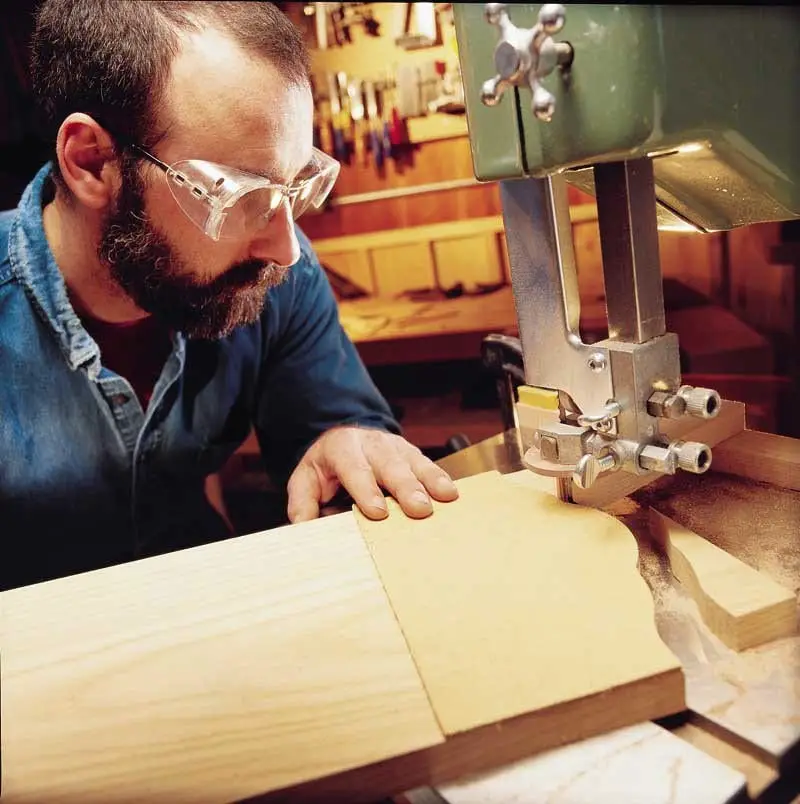
Also, please remember to wear several protective types of equipment such as safety goggles and masks to avoid accidents. There will be several flying saw dust so it is best for you not to inhale those particles. Furthermore, the wood might chip and it may fly off in your direction so it is best that you protect your eye while working on your project.
Step 2: Cutting a Straight Line
If you are going to work on a project, it is fairly safe to say that you need to work on the easiest part of the procedure first. For the case of the woodworking project, cutting straight edges is the easiest part. Using the band saw to cut straight edges is a good idea since it is very easy to use and maneuver. Mark first the straight edge that you want to cut using a pencil or marker. Be sure to have the proper measurements before cutting it using the saw. Once you have done this, you need to know that some of the blades of the band saw leave behind saw marks.
So, it is advisable that you put behind extra materials so that after the smoothing process, all of your measurements will be accurate. Nevertheless, once you have mastered the proper cutting techniques partnered with the right measurement, you would not be needing to leave any extra material. You can be sure now that the measurements you put before and while cutting are precise.
It takes practice to master the skill of cutting a straight line. Nevertheless, the key for this is to have the steady hand and a firm grip to have a full control of the machine. If you have a shaky hand, you might want to use a fence to guide your wood while moving in a certain direction. This is really advisable especially if this is your first time cutting using a band saw.
Step 3: Starting to Cut the Curved Edge

Now, you are ready to cut the curved edge. Nevertheless, there are several tricks that you need to do in order to give that wood a polished curved cut.
As per all cutting processes is concerned, you need first to mark all the curvatures that you need to cut. The difference with the process of cutting curves is you need to add markings for the relief cuts during the process. The relief cuts are placed in order to help the woodcutter during the process of the curvature cutting. You will not cut the whole curve in one straight go. Instead, you will have to do it piece by piece, stopping at the relief cuts for a moment. The relief cuts are placed where the curvature is making a transition or sharp turn. This process helps the easing up the contour and it allows the blade to do short manageable cuts.
Step 4: Maintenance
Maintenance check is essential to keep your machine from deteriorating. Furthermore, it will ensure that for every project you work on, the machine is working properly. This will reduce the risk of injury and even serious damages to you. Moreover, the quality of your output rests upon the efficiency of the machine you are using. Therefore, it is important to have the machine working on its optimal performance so that you will be sure that everything it does is polished.
The maintenance part of the machine is fairly easy. This may only take about 30 to 60 minutes of your time. All you need to do is to have a proper schedule for this kind of thing. To be able to do the maintenance check efficiently, you need to refer to the manufacturer’s manual so that you will be familiar with the machine’s necessary checkpoints.
First, you need to clean-up every part of the machine before and after use. Always remember to use sharpened blades for every project. Furthermore, to make the blade last longer, you should use cool blocks so that it would prevent the steel blade to overheat.
You would also need to replace the lubricant and fluid in the machine for about every three months. This is to ensure quality and topnotch performance. This will prevent any unnecessary failure while doing your project.
Conclusion
In summary, the band saw is a great and versatile product to work with. It can get you several designs and shapes if you can get to maneuver the machine in the way that you want it. First, you need to set-up the machine so that it will be sturdy once the motor is turning. Place the blade by locking it in the belt area. Make sure to use properly sharpened blade so that the output is smooth. For cutting straight edges, have a firm grip and steady hand so that the line will be straight. Leave an extra material for the smoothing process. For the curvatures, provide several relief points so that the process of cutting the curve will be divided into smaller tasks.
Ultimately, follow proper safety rules and practices while working on your project.
