Are you a lover of wooden furniture? Do you need fancy wooden chairs for your house to make it look beautiful? I bet you do! People nowadays prefer wooden furniture over plastic and rod iron. It is normal nowadays for the older fashion to be back in trend. You can simply buy chairs for your house from the market but they will be just identical to your neighbor’s ones, or your colleagues or a friend’s. Why not do something of your own? Why not have the kinds of chairs that no one else does? Why not design and make your own chairs?
People say that how you keep your house and what you keep in it tells a lot about the ones living in it. It truly brings out your personality. So why not set ourselves apart from the others? Not a problem anymore! This article is to help you create your own wooden chairs. It might even save you a few dollars. Self-made Wooden Chairs would give your house a nostalgic look. Making your own furniture might as well give you an inner satisfaction and feeling of contentment. So what are we waiting for? Let us get started!
Materials Needed
- 1-1/4″ pocket hole screws
- 2-1/2″ pocket hole screws
- 1/4″ wide flat reed splints
- Regular office stapler
- 5/8″ brad nails
- Wood glue
- Finishing supplies (primer & paint, or stain, sealer)
- Wood Shaping tools
- Trimming machinery
- Hand scrapper
- Wood filler
- Polyurethane
- Screw Driver
- Drilling Machine
- Inch Tape
- Pencil for Marking
- Hammer
Lumber
- 1 – 1×3 at 4′
- 1 – scrap of 1×4 at 16″
- 2 – 2×2 at 8′
- 1 – 2×4 at 6′
- 2 – 1″ round dowel rods at 3′
Pro Tips
- You can easily buy all of this stuff from any local hardware shop. It is easily available.
- You can also try buying it from any online store. But in that case, only make purchases from a trusted seller.
- Before you make any purchases, especially the kind of wood you are using, make sure that it is of good quality. Its characteristics should match the project requirements you are working on.
- Use a sharp pencil to make the markings on the wood and cut exactly.
- Also, the heavy tools can be rented from near-by hardware stores.
Step by Step Instructions For How To Build Wooden Chairs
You need good assistance in assembling a project specifically if you are doing something like this for the first time. Make sure you have collected all the material mentioned above. Also be sure that you make all the cuttings as described. Here are steps you should follow.
Step 1: Measuring, Marking and Cutting the Wood
The first step is to make measurements of the chair. The legs, the back rest, the seat, etc. and then cut them accordingly. The details of measurements are mentioned listed below.
So, the Cut List of the wooden material for the preparation of the chair include:
- 2 – 2×4 at 35″ – Back Legs
- 1 – 2×2 at 16″ – Lower Back Stretcher
- 1 – 1″ round dowel at 16-1/2″ – Back Seat Stretcher
- 2 – 1×3 at 16″ – Back Rest
- 1 – 1×4 at 16″ – Upper Back Rest
- 2 – 2×2 at 18-1/4″ – Front Legs
- 1 – 2×2 at 16″ – Front Stretcher
- 1 – 1″ round dowel at 16-1/2″ – Front Seat Stretcher
- 2 – 2×2 at 16″ – Side Stretchers
- 2 – 1″ round dowels at 16-1/2″ – Side Seat Stretchers
- 1 – 2×2 at 16″ – Center Stretcher
Pro Tips
- Cutting/ preparing all the wood and tools beforehand can be extremely helpful because if you have prepared everything, all you would have to do now would be the compilation of the chair.
- Additionally, you must have some technical know-how to make use of the professional tools that are used for the compilation of this project.
- After you are done collecting all the material and necessary information, you are ready to start making the chair.
- Use the sharp 2H wood friendly pencil to mark the measurements properly.
- Learn as much as you can about wood work before you start working on any project.
- Make sure you use the best and finest quality of wood as well as tools.
- Be extra careful while using the machinery especially the woodcutter, drilling machine, etc.

Step 2: Shape the wood
Step 2 would be shaping the wood using the machine. You now shape the legs, the back rest, the seat, etc. The 2×4 pieces would fit perfectly for the back legs.
Pro Tips
- You should use a work bench or a steady table for measuring/ marking, cutting and shaping the wood so that it doesn’t move while you are working with the wood.
- This will protect you from making the wrong cuts and even hurting yourself.
- Make sure that the tools are not rusty.
- Lubricate your machinery with machine oil before using it to avoid any hindrance between your work.


Step 3: Drilling and Gluing/ Assembling
This step involves assembling of the chair. Mark the positions on all four legs for the dowel holes. After marking them, use a drill machine to drill a 1/4″ deep hole using a 1″ Forstner bit.Mark the ends of the wood using the drill so that you know which part goes where. Now apply glue into the holes.
Pro Tips
- Mark the spots for the dowel hole properly so that they are visible where the holes are to be drilled.
- Use a 2H sharp pencil.
- You can make hole manually with the screw driver and hammer as well but a drill machine is preferably better.
- For that, use a 1 inch Forstner bit drill.

Step 4: Fit in the stands
After gluing the drilled holes, find the pieces for the side stretchers and the side seat stretchers together (vertically shaped wood that would act as a support beneath the seat) and fix them up. Fix all four legs together using the support.
Pro Tips
- Assemble the side support or stretches into the dowel holes of/ between the legs using wood glue.
- You can also use the 2-1 or 2″ pocket hole screws.
- You can also create a center stretcher for your chair.
- For that, you won’t need to fill the holes because they would already be facing downwards.

Step 5: Joining and fixing of the seat
When all the four legs are joined together, fix them into the seat from the bottom from where you drilled the holes for the legs. Use a hammer to fix them right into the drilled holes.
Pro Tips
- Mark and drill the holes on the surface of the seat after you are done assembling the legs and stretches.
- The support or stretchers should be balanced as well as give a pretty look.
- You can fix the stand beneath the seat.
- Additionally, you can apply some glue at the bottom if you feel there is space for the support to move.
- You can also fix it with screws.

Pro Tips
- The cross-cut that will come up into the sitting area should be fitted with 4 small squared wooden pieces. Use a hammer to make it fit.

Step 7: Scrapping off the extra wood
The last step would be scrapping off the extra wood from your seat to smoothen the surface of the seat.
Pro Tips
- Use the machinery with great care.
- If you use a manual tool, be sure the take all the safety measures.
- Scrapping the extra wood gives a good finish to your project.
- Make sure you scrape all the sides and the center even.
- Do not make excessive use of it. It might make it give a rough and uncomfortable touch.

Step 8: The back rest of the chair
Pick out the pieces of the lower and the upper back stretcher, the back seat stretcher, the back rest, and the upper back rest. Mark the arc on the 1×4 piece to drill holes at one end (the back) of the seat and make a back rest for it. The wood you already have, you can shape it into small vertical sticks/ stands with an arched shape upper back rest for them. You can use the same technique you used to fix the 4 legged stands into the seat for the vertical sticks. And you can fix the top of it by using simple wood glue. You can also scrape the edges to make them smooth accordingly.
Pro Tips
- Drill holes in each end of the back rest.
- Drill appropriate holes.
- Keep in mind the thickness of the material.
- You can also make use of the 1-1 up to 4″ of pocket hole screws.
- Shorter back rests give a very decent look and are comfortable as back rests.

Step 9: Painting and Polishing
The last step would be the finishing. You can either paint or polish your wooden chair according to your preference. Some people only like to the stain their wooden furniture rather than painting for polishing it.
Pro Tips
- You can use paint brushes to paint the chair.
- Some people prefer using the automatic paint spray.
- In both cases, be careful about your skin and eyes.
- You can use a dust mask for precaution while painting, polishing or staining the chair.
- For long lasting effects and protection, use good quality of polyurethane.
- To protect your model from water or other chemicals, use clear finishes for the chair.

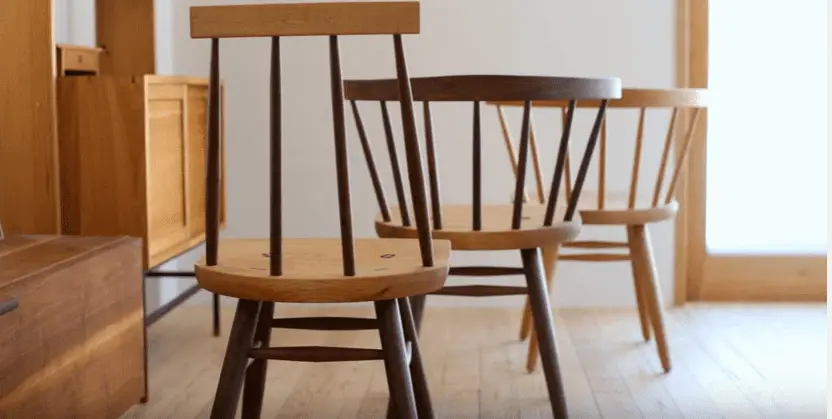
Here’s how they would look!

Compiling a table may be very easy but it takes a lot of care to maintain the beauty of your furniture. Since you spent a lot of time making the project, a lot of your money, hard work, blood and sweat went into it. Here are some pro tips you can use for the better maintenance of your furniture
Pro Tips
- Clean your chair regularly.
- Use a dry cloth to do so.
- Use rugs under it.
- Repair any damages done to the table immediately. These may include cigarette burns, pores, dents etc.
- Do not place it into the sunlight for a long time.
- Do not expose it to fire.
- Keep away from water.
- Do not allow any chemical compounds to be in direct contact with the chair.
- Wipe up all or any of the spills on the chair immediately.
Links to resources
It might be easy for some of you to buy the wood, tools and other materials from vendors or hardware shops. But some people might find it difficult to go all the way to the market to purchase all that stuff.
This amazing work belongs to a group of extremely talented young Japanese people where they work hard with dedication satisfying their customers. They are brilliant in the work they do. They are a bunch of people who respect nature and as soon as they look at a tree, they think of impressive and incredible things it can be transformed into. Their YouTube page and Website links are given below.
- Profile on YouTube: https://www.youtube.com/channel/UC7FkqjV8SU5I8FCHXQSQe9Q
- YouTube video: https://www.youtube.com/watch?v=uJbqA1BQt1A
- Website: http://tecori.com/
Conclusion
This guide was written to help out the people who love making stuff at home. It not only keeps you from staying idle but it also saves you a few dollars. Tutorials like these help creative minds become more creative. We hope that you enjoyed working with these instructions and that they were of help to you. Do let us know how helpful this was by sending us your feedback. You can also comment below for any kind of help or queries. I hope you managed to build nice chairs. I really had fun writing this article, and can’t help but think how much fun it would be if I were making it!
If you liked this and found it helpful, please share it with your friends or on social sites so that others can benefit from it too. I’m sure they would need some pretty furniture that they can try making too!
