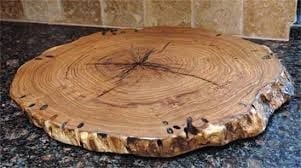
Are you willing to own a classy and beautiful rustic coffee table?
For sure, having an elegant ambiance with your favorite coffee is no less than perfection.
Buying it can be a solution but what if you have better yet cheaper alternatives?
If you are up to buying one, it might be expensive. Therefore, you don’t have to worry about that anymore since you can now build a coffee table by yourself. This step by step tutorial will help you build a really cool rustic wheeled coffee table from scratch at home.
For this project, you need to have some basic experience of using the woodworking tools like a wood cutter and screwdriver.
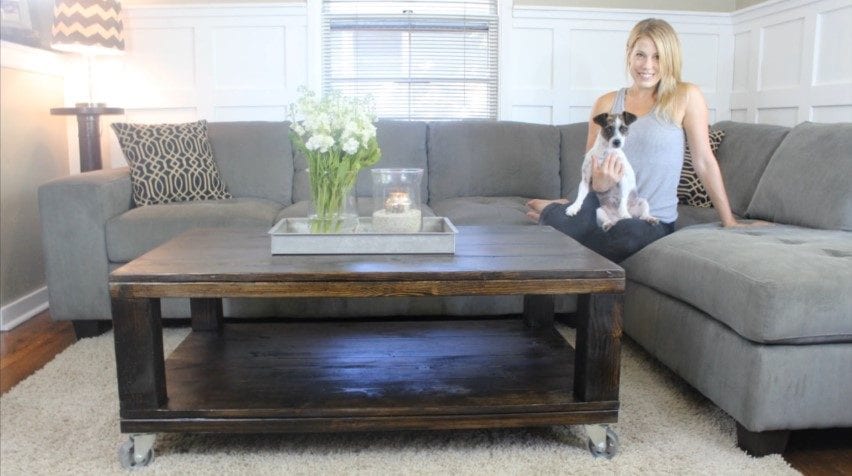
The coffee table we are building here is wheeled so that you can easily move it around the place for whatever use. This tutorial explains every single step involved in building a wheeled coffee table in the easiest way. So are you ready for the beautiful coffee table as shown in the final product picture?
Building a Rustic coffee table is no longer a difficult task thanks to this detailed step by step tutorial.
Product Dimensions: 46’’ (length) x 29’’ (width) x 19’’ (height)
So what are you waiting for? Let’s get started.
Items Needed for this Project
Here is the list of materials and tools you will need to complete this DIY woodworking project.
- Two 2’’ x 2’’ x 8ft
- Two 2’’ x 4’’ x 8ft
- Four 1’’ x 8’’ x 8ft
- One 4’’ x 4’’ x 4ft
- Four 3’’ wheels (1 ¼’’ height) with 2’’ screws
- A few 2’’ trim head screws
- A few 3 1/8’’ trim head screws
- Wood filler
- Stain
- Polyurethane
- Sanding block
- Screw driver (Drilling machine)
- Wood cutter
- Inch Tape
- Pencil for marking
- Hammer (optional)
- Iron rod (optional)
You can easily find all these items at any of your local hardware stores or buy online for better price offers. Be sure to buy only good quality materials if you want to build a strong table. In case you are not sure of the best quality material, research online for the right woodwork products for your specific project. Purchase only from a trusted seller.
Step 1: Measure, Mark and Cut the pieces
Use the inch tape to measure the lumber and mark following sizes using a pencil.

- 2’’x2’’s: four pieces, each 46’’ long
- 2’’x4’’s: six pieces, each 26’’ long
- 1’’x8’’s: eight pieces, each 46’’ long
- 4’’x4’’s: four pieces, each 10 ¼’’ long
Use a wood cutter to cut the lumber at marked positions.

Make sure that the pieces are perfectly even and proper sized. You should now have 22 pieces of lumber wood into sizes mentioned above.

To give your table a more rustic and distressed look, beat up the 4’’x4’’ and 1’’x8’’ board pieces using a hammer and/or iron rod.

Read more tips below or move to the next step.
Pro Tips
- Use a work bench to secure the lumber so that it doesn’t move while cutting.
- Use the drill machine carefully to ensure safety.
- Attach screws thoroughly till the end.
- Use a sharp 2H pencil for proper marking on the wood.
- When marking a line, hold the pencil such that there is no space between the pencil and the measuring device.
- If you are using a tape measure, be sure to hook its one end firmly to the wood’s edge.
- In order to find out the center of the wood board, place the measuring tape across the board width such that each edge of the wood coincides with a whole number. Mark the middle point and that is your center.
- When using a table saw to cut the wood, keep the blade a little high for a cleaner cut.
- Use small teeth blade to achieve a much smoother edge.
- If you are still unable to cut the wood in the perfect size, just cut it a little bit oversize, and then trim to the right dimensions.
Step 2: Prepare the Base Frame
Take three of the 2’’x4’’ pieces and two of the 2’’x2’’ pieces and arrange them in the following manner.

Now, attach them together using two 2’’ trim head screws at each joint. The result should look something like this.

Let’s call it frame1.
Take four of 1’’x8’’ lumber boards and lay out them altogether. Make sure to put them in a symmetry-like fashion to form a perfect rectangle structure.

Now place the frame1 over the laid out boards. Move it carefully to make sure that all sides are aligned to the boards.

Attach the frame1 to the 1’’x8’’ boards using 2’’ trim head screws. Use two screws at each corner as well as in the middle of the table.

You may also use some screws along the 2’’x2’’ board for added security. The base frame is now prepared. Let’s name it base frame1.
Guess what? You get to build one more frame just like the one above. You just have to repeat the same process of Step 2 to build another frame similar to the base frame1. We will call it base frame2.
Now you have two identical frames.

These will be the top and bottom of your coffee table. Let’s now move to the next step.
Pro Tips
- Consider using wood screws rather than generic screws as they are better for wood piece drilling.
- If you are not comfortable drilling screws directly into the wood, you can drill a pilot hole first that will work as a path guide for the screw.
- Make sure that the screws are of appropriate size (follow the dimensions mentioned in the materials section).
- Make sure that the screws are not rusty.
Step 3: Build the Final Table Frame
Take four 4’’x4’’ lumber pieces and place them on the floor in the estimate dimensions of your table.
Take the base frame1 and put it over the 4’’x4’’ boards. Align the corners of the frame with the 4’’x4’’s. Attach the frame to each of four 4’’x4’s using two 3 1/8’’ screws at each corner.

Flip the table over. Place the base frame2 (show in the image below) onto the 4’’x4’’s.

Make sure the corners of the frame are aligned with the 4’’x4’’s and then attach the frame to the 4’’x4’’s using two 3 1/8’’ screws at each corner.

When you’re done, the final piece should look something like the one in the image above. Flip it over and move to the next step.
Step 4: Filling, Dyeing, and Finishing
Use the wood filler to fill visible screw tops and holes, if any.

Let the filler dry. After that, sand down the entire table using the sanding block.

Do it properly to make sure that there are no asymmetric edges anywhere on the table.
Use a good quality stain to dye the table entirely.

You can use an old piece of cloth or a brush to stain the table. Make sure that the color reaches to every corner and joint of the table. Let it dry for some time.
After the stain dries, use the polyurethane to finish the table.

This process is called finishing, which provides protection against dust and rust. Let the poly dry now. It may take a few hours for polyurethane to dry properly.
Pro Tips
- Use a dust mask or respirator to protect your eyes and skin while staining and finishing the table.
- Use a good quality sanding block or sandpaper to level the scratches or marks on the table. Remove the sanding dust using a dry brush or vacuum cleaner.
- Apply the stain using a brush and do not overlap the already stained area.
- Use a stain and finish material separately than a combination of the two, which is basically a more dense stain.
- Oil-based polyurethane is usually recommended over water-based finishes because it offers great durability and finishes.
- Choose the right application tool based on the type of stain you are using.
- The longer you let the stain be on the table, the better color it gives.
- The stain only provides color; you will still have to use the finish for better protection.
- Stir the stain can properly before opening it.
- For a darker tone, apply two or more stain coats.
- Use a good quality polyurethane finish material for long lasting protection of your coffee table.
- For protection against water and chemicals, use clear finishes.
Step 5: Attach the Wheels
A wheeled coffee table is incomplete without wheels. Once the poly is dry, flip over the table (upside-down). Now take four wheels and place one in each corner of the table. Attach the wheels using the screws.

Flip the table over.
Ta-da! Your rustic wheeled coffee table is ready. And by the way, it looks awesome.

Pro Tips
- In order to stop the screws from losing over time, you can bend some of their threads down using a hammer before drilling. It will go inside fine, but won’t come out easily.
- Clean your coffee table regularly to prevent the dust from settling on it.
- Use rugs under the coffee table.
- Repair the table immediately, if ever damaged.
- Do not allow water or any chemicals to be in direct contact with the wooden table.
- Do not put your coffee table in the direct sunlight for long periods.
- Use a good quality bleach or cleaner to remove stains from the wood.
- Do not place the table in direct contact with a fireplace.
- Remove and repair cigarette burns, stains, dents, pores, warps, etc. as soon as they occur.
- Do not place wet or hot objects directly on your table. Wipe up spills immediately.
- Re-finish your coffee table at least once every year.
Sources
Here is the link to the source YouTube video that inspired and helped us to write this wonderful step by step tutorial for building a rustic coffee table. https://www.youtube.com/embed/NjIXNaEeMUg?rel=0&modestbranding=1&controls=0&showinfo=1&fs=0&wmode=transparent
The video was created and uploaded by The Rehab Life. One of their team members narrates the step by step process in the video.
Helpful Tips
- If you have no previous woodworking experience, start with smaller projects like drilling in woods, attaching two wood pieces together, etc.
- Learn as much as you can about the woodworking craft before you start this project.
- Use only good quality tools and materials.
- Be very much careful when using the wood cutter, drilling machine, and other such tools.
As I mentioned before, this tutorial is designed to help common people to build a wonderful coffee table at home, without having to buy one at a high price from the market. I sincerely hope that you enjoyed the tutorial and most likely managed to build a nice coffee table yourself. Tell us about your experience with this tutorial. Did you like building your first coffee table at home? Did you enjoy it? Did you find the tutorial helpful? Is it descriptive enough?
I, myself enjoyed very much writing this guide to make the rustic coffee table and I hope my readers feel the same. Tell us more about your experience and what you think in the comments. If you like the article, feel free to share it with your friends on social sites to help as many people as possible. Being able to build a nice coffee table by yourself is an important thing and it definitely saves you lot money. I am sure many of your friends would love to know about this DIY tutorial. Use the share buttons below to share it.
References
http://www.instructables.com/id/How-to-Measure-and-Mark-with-Precision/
http://www.doityourself.com/stry/6-tips-for-drilling-wood-screws
http://www.minwax.com/how-to-finish-wood/wood-maintenance-and-repair/
