11) U-Style Shooting Bench
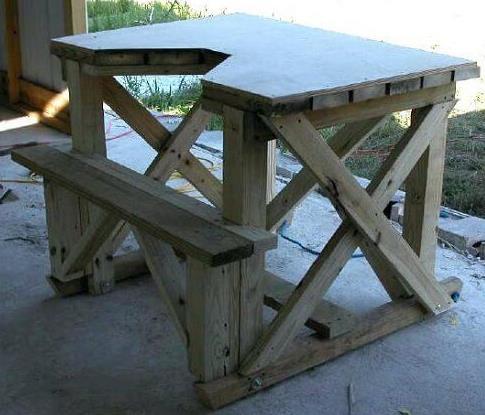
This shooting bench was designed and built with the use of salvaged lumber. The primary goal of this project is to build a comfortable, and inexpensive shooting bench that provides more room for shooting maneuvering. It has a rustic look because of the salvaged boards used. The top portion has wooden slats supporting and covered in a plywood. The shooter can maneuver properly because of the U-shaped cutout. This project has a medium difficulty level.
For the construction of this DIY shooting bench, the X-braces reinforced the frame for greater stability. This shooting bench has a comfortable seat minimizing fatigue. The pieces were assembled with the use of bolts, washers, and nuts. Because of this, it is possible to disassemble the shooting bench into just three pieces for easier transportation. Now, you can create your very own shooting bench plan confidently.
Helpful Link:
12) Homemade Portable DIY Shooting Bench
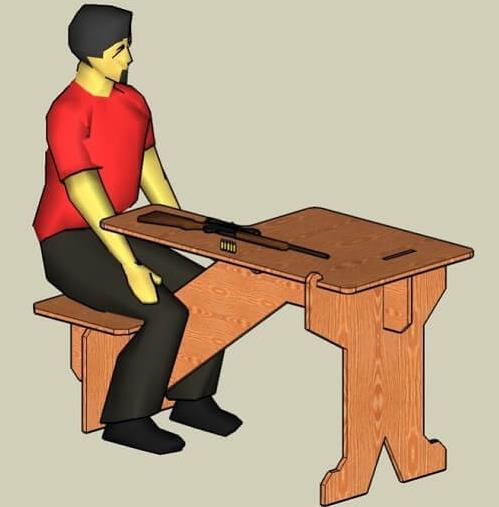
Do you need a portable shooting bench for better maneuvering? This is a homemade portable DIY shooting bench. It is a great choice for short-range shooting. It’s a simple and easy to create a bench that can be assembled within seconds. This shooting bench was constructed using plywood. You just need a single sheet of plywood to create this shooting bench. To assemble the pieces, tab and slot joinery were used and secured with screws. For your utmost comfort, a seat has been installed on the shooting bench.
If you want a portable bench, this shooting bench plan is highly recommended for you. You don’t have to be highly-skilled in woodwork or carpentry just to finish this project. It is also low-cost and requires minimal time frame to complete. It is about time to test your carpentry skills by starting this shooting bench plan now.
Helpful Link:
http://kosterknives.com/wp-content/uploads/2011/08/Knockdown_Shooting_Bench.pdf
13) L-shaped DIY Shooting Bench w/ Seat
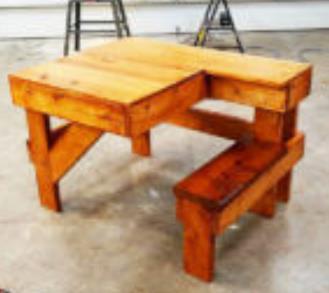
Jack Sander is an experienced DIY builder and this shooting bench is one of his best masterpieces. He wanted a shooting bench that’s easy to build with the use of basic skills, tools, and materials. It’s also made to be portable with its lightweight built. Jack built this shooting bench with the use of lumber for the shooting bench frame and the top is made of plywood with an L-shaped design, giving more legroom.
The builder added a built-in seat so you can just sit and relax while you’re taking an aim. Braces were used for reinforcing the frame so the shooting bench does not flex. Jack Sander built this DIY shooting bench in minimal time on just one weekend. You can also create your very own shooting bench using the basic materials. Check the full details on the helpful link below.
Helpful Link: http://howtospecialist.com/workshop/free-shooting-bench-plans/
14) Swivel Shooting Bench Plan
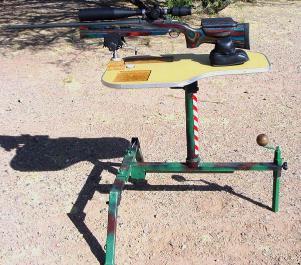
The builder tried scoring the best bench designs over the years. His design turned out to be one of the best designs ideally used in field varmint shooting. It is sturdy with features suitable to used when busting prairie dogs. This shooting bench has a similar design to commercial products worth more than $500. This swivel shooting bench is even more stable. It has features not seen on commercial products.
When it comes to the bench construction, it is made of steel that can be seen in good supply yards. The builder used a chunk of threaded 2 inches conduit. The builder also used countertop sink cutout, nuts and bolts, some screws, and a pipe coupling that has been cut in half. The tools needed include a drill, a welding equipment, and grinding equipment. The top table is mounted on a bar stool that you can swivel to pan across the terrain. When it comes to the rear leg, it is lightweight and can be adjusted for elevation.
Helpful Link:
https://www.shootingsoftware.com/bigprojects.htm
15) Wooden Shooting Bench Plan
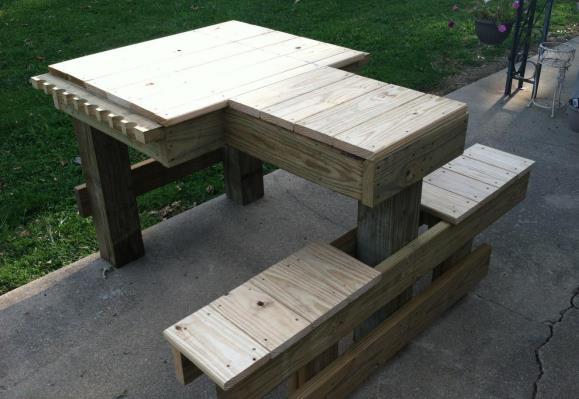
The materials used for this shooting bench project include a circular saw, drill, screwdriver, level, square, pencil, tape measure, rasp, file, sander, hole saw, and eye and ear protection. The materials used include lumber, decking board, and screws. For the assembly, the table top has been screwed together using 3 inches screws. The 3 braces and 3 legs were attached using 3 inches screws. You may need some help when flipping the table over because it gets heavy at this point.
The decking boards were attached, making the surface table with the use of 2 inches screws. Make sure that you sink the screws into the wood slightly to avoid damaging the item laid on the surface. You can build two legs for the seat using four 2x6s cut into 17 ¼, screwing them together. The decking boards are attached to the seat using 2 inches screws. You can make a flushed back to create a slight overhang in front.
Helpful Link:
https://sierrabullets.files.wordpress.com/2017/08/shooting-bench-plans.pdf
16) Portable Shooting Bench by Porter Custom Calls
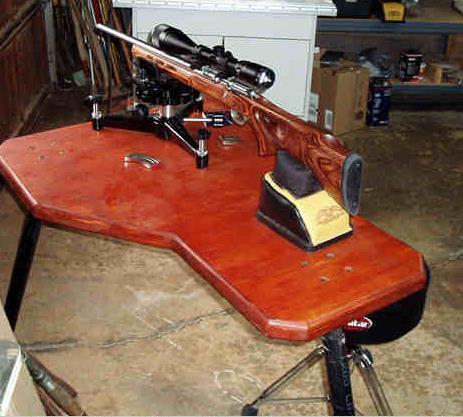
The materials used in building this portable shooting bench include A/C plywood, steel plate, threaded couplings, flat head bolts, lock washers, drywall screws, lock nuts, and glue. The degree of difficulty in building this DIY shooting bench project is intermediate. This shooting rest can eliminate some shooting errors caused by incorrect alignment of the rear bag correlated to the front bag because it is easy to torque causing flyers.
In order to the fabricate fine tuning windage adjuster, the builder used a stainless steel rod ½ by 20 tpi. The ole aluminum stabilizer rod was modified with the weighted section saw into 2 pieces and drilled then tapped for the stainless steel rod working for the knobs of the adjuster. The builder added a winded pressure pad and a bronze bushing. The builder tested the shooting bench and made some modifications because of the windy weather conditions in his area. This is a portable shooting bench good for traveling.
Helpful Link:
http://www.portercalls.com/portable_shooting_bench.htm
17) Shooting Bench Plan by Aerospaces
The materials used in creating this project include 28 x 36 x 1 inches plywood, galvanized floor flange, galvanized pipe, galvanized metal end caps, 1 x 4 1/2 x 24 inches oak, and wood screws. For the construction plan, you can begin with a piece of 1” plywood 28 x 36 inches in size. You can also use a 3/4” plywood in a pinch. A 1” plywood gives a stiffer shooting table. Make sure to select the good side of the plywood that serves as the top surface, turning it side down.
You can mark the ugly surface as the “BOTTOM” to avoid getting mixed up. The bottom surface will serve as the layout surface and line work area. Mark all dimensions, outlining as shown in the plan with the bottom area facing up. To shape the shooting bench, you can now cut the shooting table top.
Helpful Link:
http://www.aeroaces.com/bench1.htm
18) Plywood DIY Shooting Bench by Gun Customizing
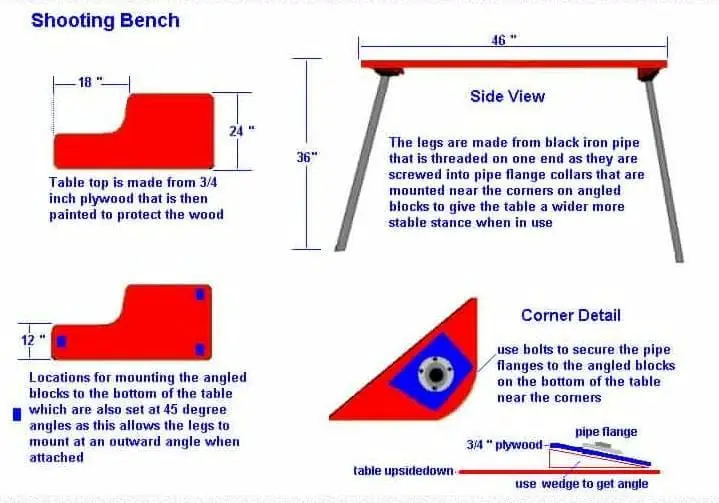
This bench can be built using 5 quarter boards. The tools used include a circular saw to cut table edges, drill to install screws, belt sander to ease all edges, pencil, straight edge, and paintbrush. The level of difficulty in building this shooting bench is easy to medium depending on the carpentry skills of the builder.
When it comes to building the table, you have to get the pipe’s sections longer than required and saw to length in order to obtain the correct height. To avoid the legs from sinking into the ground, you can weld small feet to the bottoms. Use 3 wedges (edges and center) on the mounting blocks for greater stability. Use a double plywood if preferred for greater durability. It is built for the right to left-handed shooters by flipping it over, having the cutout section on the right or left to best cater the needs of the shooter.
Helpful Link:
http://www.guncustomizing.com/shootingbench.htm
19) Free Shooting Bench Plans by How to Specialist
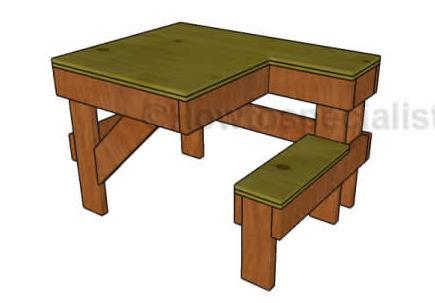
This shooting bench plan provides a step-by-step guide designed for a simple woodworking project. Anyone with the basic tools and carpentry skills can build this plan in one weekend. You do not have to invest hundreds of dollars or be an expert to build this shooting bench. It is portable and lightweight. You can build this project without too much stress and hassle, enhancing your carpentry skills and a source of enjoyment.
The site highly recommends using materials that one can afford. Purchase quality lumber like pine. Make sure to take accurate measurements prior to size adjustment of the components at the correct size. You should drill holes before you insert wood screws to void wood splitting. The tools needed for this shooting bench project include glasses, safety gloves, jigsaw, miter saw, tape measure, chalk line, and drill machinery and bits.
Helpful Link: http://howtospecialist.com/workshop/free-shooting-bench-plans/
20) Free Shooting Bench Plan by Bench Rest
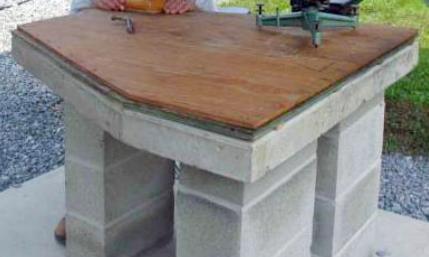
This is a very informative site that educates viewers about building shooting benches. One important thing to consider when building a shooting bench is the needs of disabled or handicapped shooters. It is important to have a wheelchair accessible. Shooting benches tend to stay for a long time. You’ll realize that it is worth the effort building them right.
Always keep in mind the quality and the cost. Do not compromise quality over the cost. A good wood shooting bench with a good paint applied every few years can last up to twenty years or more. Choosing wood for the top of the shooting bench will last longer if you attach the boards on the frame for the bark side of the tree upwards, shedding water better. You can also use medium density fiberboard or MDF products designed for the top. The MDF product can lend itself to create rounded corners and router molded edges.
Helpful Link:
