21) Andy’s Flicker House Plan
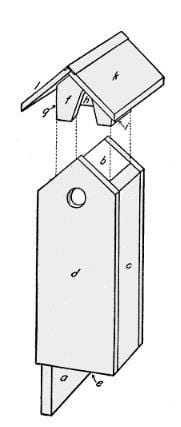
Andy’s Flicker House Plan is specifically designed to be placed on a stub of a tree or post. The roof of this flicker bird house plan can be lifted similarly like a stopper and it is removed from a bottle. The thickness of the board is a ¾ inch. Attract flicker birds with Andy’s Flicker House Plan. It is easy to follow and the diagram is clear on the website. So browse the links below to get to know more about flickers and building a nice birdhouse.
Helpful Links:
http://www.freebirdhouseplans.net/flickerbirdhouseplan.html
22) Andy’s Phoebe Bird House Plan
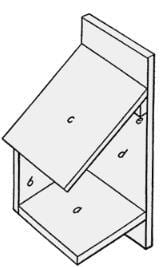
Phoebes just like nesting around buildings, as well as a simple shelf under the porch’s roof or shed. It is still desirable to let your phoebe them outside, so the shelf should be provided with a good roof.
On the picture, it shows a shelf shielded against harsh weather by a roof and one wall. This birdhouse shelf can be placed high in a two-story building, underneath the eaves. It may attract phoebes, robins, and barn swallows. When building one, you’re likely to build upon it if it’s not less than 8 feet from the ground.
Helpful Links:
http://www.freebirdhouseplans.net/phoebebirdhouseplan.html
23) Purple Martin Bird House Plan
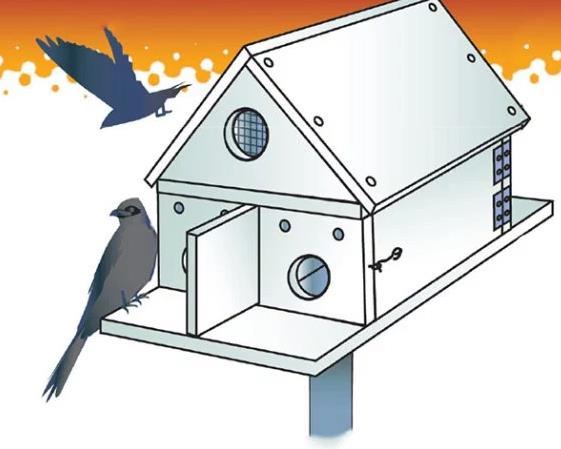
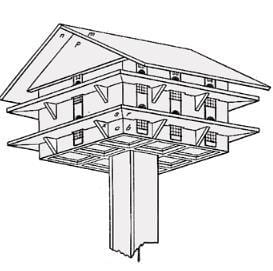
Martin birdhouses are usually built on apartment plans for satisfying the social instinct of purple martins which is lacking in most other birds. These usually contain about 10 or 12 rooms. That is why this plan is relatively complicated, most especially if they’re miniatures or resemblance of elaborate buildings.
It is important for a birdhouse to be easily inspected and cleaned from top to bottom. It should be protected against English sparrows. In this plan, the pole is very hollow, running a cord wherein the birdhouse is lowered and raised. The floors are removable by just lifting up. It has a concrete base with a 2-inch iron pipe as a core, extending upward to make firm connections with the upper portion as it slides. A removable heavyweight holds the birdhouse hard against the roof. The pole can be made of a 4-inch single galvanized pipe, set in a concrete base.
Helpful Links:
http://www.freebirdhouseplans.net/purplemartinbirdhouseplan.html
24) Woodpecker Bird House Plan
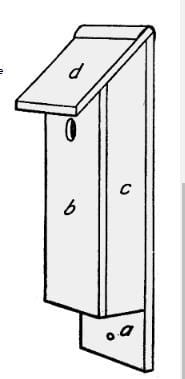
A Woodpecker birdhouse is suitable for the woodpecker family as well as chickadees, nuthatches, and titmice. This is attached to the boles of trees, and the bottom part is removable, as shown in the diagram. This is a relatively easy Woodpecker bird house plan that first-time carpenters can do or for past time wood makers.
You need to make sure that you provide adequate ventilation by drilling 4 small 1/4 inch holes beneath the roof. It is also important to provide proper drainage. You can do this by drilling 4 small 1/4 inch holes in the floor of the birdhouse. You can add some wire mesh or grooves below the hole inside, rough enough to make it easier for Woodpecker birds to get out of the nest box.
Helpful Links:
http://www.freebirdhouseplans.net/woodpeckerbirdhouseplan.html
25) Wrens Bird House Plan
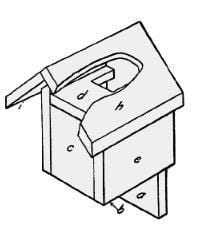
This Wrens Bird House Plan shows a birdhouse that is designed specifically for wrens as well as house finches. If you want this birdhouse design for wrens, you can place it on a fence post or tree. For house finches or wrens to use this birdhouse, you can attach it near the eaves of the house or building.
As you will see on the website, the front gable of this wrens birdhouse plan is open. The entrance to the room just below goes through the rear side of the upper floor. This wren birdhouse can be opened when you need to clean it by simply lifting out the upper floor. This birdhouse plan is relatively easy to make by first-time makers.
Helpful Links:
http://www.freebirdhouseplans.net/wrensbirdhouseplan.html
26) USGS Birdhouse Plans
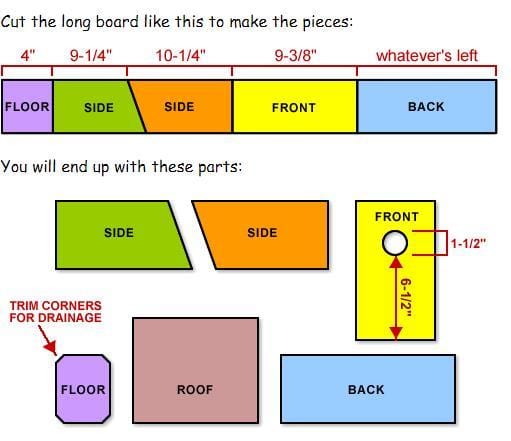
Birds do not really live in the birdhouses humans make, but some bird species use them for their nesting cycle. These are the bird species that normally raise their lovable chicks in hollow trees. However, hollow trees are difficult to find. The USGS Birdhouse Plans are suitable for attracting Tree Swallows, Titmice, Wrens, and Chickadees.
Materials:
- Standard board 1 inch by 6 inches by 4 feet long
- Standard Board 1 inch by 10 inches by 10 ½ feet long (for the roof)
- 1-3/4 inch galvanized screws or nails (20)
- 1-3/4 inch galvanized nail or screw for pivot point (2)
- Double-headed nail to hold the door closed (1)
You need to cut the longboard to make the pieces as shown in the photo and you’ll end up with the different parts of the birdhouse. The door hole’s diameter is 1 1/2-inch, allowing Bluebird in but keeping out Starlings and House Sparrows.
Helpful Links:
https://education.usgs.gov/kids/birdhouse.html
27) Handyman Birdhouse Plans
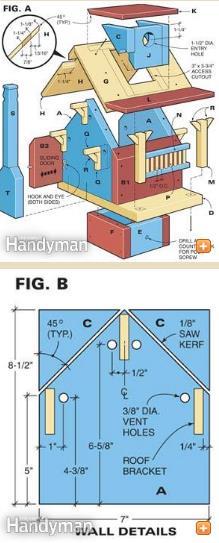
Handyman shows on their website how one can build a birdhouse plan. Surely, your imagination will run, allowing you to experiment with different shapes, materials, and designs. Just follow a few parameters according to the specific bird species you are trying to attract. The clear how-to photos are clear so you can study the drawing properly. You can personalize your birdhouse project with the details you wish like a stone chimney, cedar shingles, or shutters.
You can use any softwood such as pine, cypress, cedar, redwood, or fir. In this plan, the builder used to pine for the birdhouse base and walls. The exterior is a fir plywood for the birdhouse roof. The tools used in this project are simple. The pine boards measure 7-1/4 inches wide but it should be 7 inches wide for this project. Use a table saw to rip and narrow the width.
Helpful Links: https://www.familyhandyman.com/woodworking/projects/build-a-backyard-birdhouse/view-all/
28) Timber Mark Birdhouse Plans
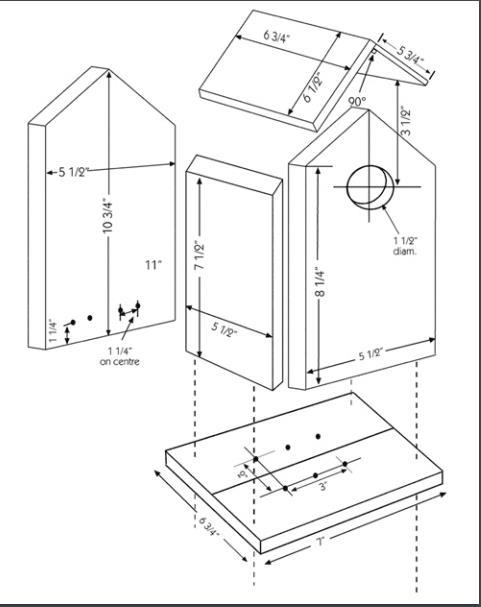
With Timber Mark Birdhouse Plans, you can choose any type of softwood like pine. Another excellent choice is cedar because it is resistant to rot. According to Timber Mark website, the use of clamps and glue yield a stronger birdhouse than nailing the pieces together. Just make sure to use a waterproof glue like Titbond II or epoxy.
The construction plan starts by cutting the parts needed for the birdhouse. The tool you need for this is a handsaw (table saw, rough saw or compound miter saw). The size hole of the birdhouse has a diameter of 1.5 inches using a large spade or a hole saw. Drill small ventilation holes that won’t be covered by a pole, tree, or building. You can use an exterior finish that can resist breakdown because of UV rays. Stick with pastel color because birds are frightened bright colors.
Helpful Links:
https://www.timbermart.ca/sites/default/files/birdhouse.pdf
29) RunnerDuck Resources
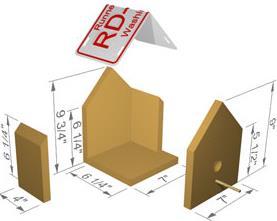
You probably have been seen these birdhouses at Saturday markets and street fairs. If you have an old license plate you can make our own RunnerDuck birdhouse. They’re simple and a great way to use up your old license plate. You will need 1 inch by 8 inches by 4 feet cedar, license plate, #6 by 1 ¼ deck screws, nails, a/4 inch drill bit, and 1 1/8 inch drill bit.
You have to bend the old license plate in the middle so it fits the roof. You might need to tap the sharp corner with a piece of wood for a little crease. You can screw the old license on the top. If you want a very good project to do with your children or grandchildren, this is a good plan for you. Enjoy creating your unique licensed birdhouse project today!
Helpful Links:
https://www.thespruce.com/free-bird-house-plans-386627
http://www.runnerduck.com/lpbirdhouse.htm
30) Beautiful Britain Birdhouse Plans

Sparrows usually nest under the eaves of buildings and houses and many modern houses aren’t ‘sparrow friendly’. The Beautiful Britain Birdhouse box will help in reversing the decline. Sparrows are homemade nest boxes using 12-millimeter exterior plywood, accommodating up to 3 breeding pairs of nice house sparrows. This birdhouse plan has a 32-millimeter hole for accommodating tree sparrows, house sparrows, and nuthatches.
Use FSC certified hardwood plywood to ensure that it won’t damage the forests or harm wildlife. This plan has 3 bird box compartments wherein the hanging brackets are installed. It has 32mm holes. It also has a removable front suitable for easy winter cleaning. A roof overhang located at the front and sides helps in keeping the interior dry. Use number 4 brass screws and waterproof wood glue to secure the panels. The front part is fixed with screws for easy cleaning at the end of the season.
Helpful Links:
http://www.beautifulbritain.co.uk/htm/wildlife_gardening/sparrow_terrace.htm
